Foolproof Chinese Pineapple Cake (No Mold Needed)

My first batch of Chinese pineapple cake cracked around the filling because I tried to wrap warm pineapple jam in cold dough. I nearly called the whole recipe a bad idea, but the fix was simple: cool the filling fully and let the dough lose its fridge chill before shaping. This version turns ordinary grocery-store ingredients into a buttery pastry without a mold or an all-day cooking project.
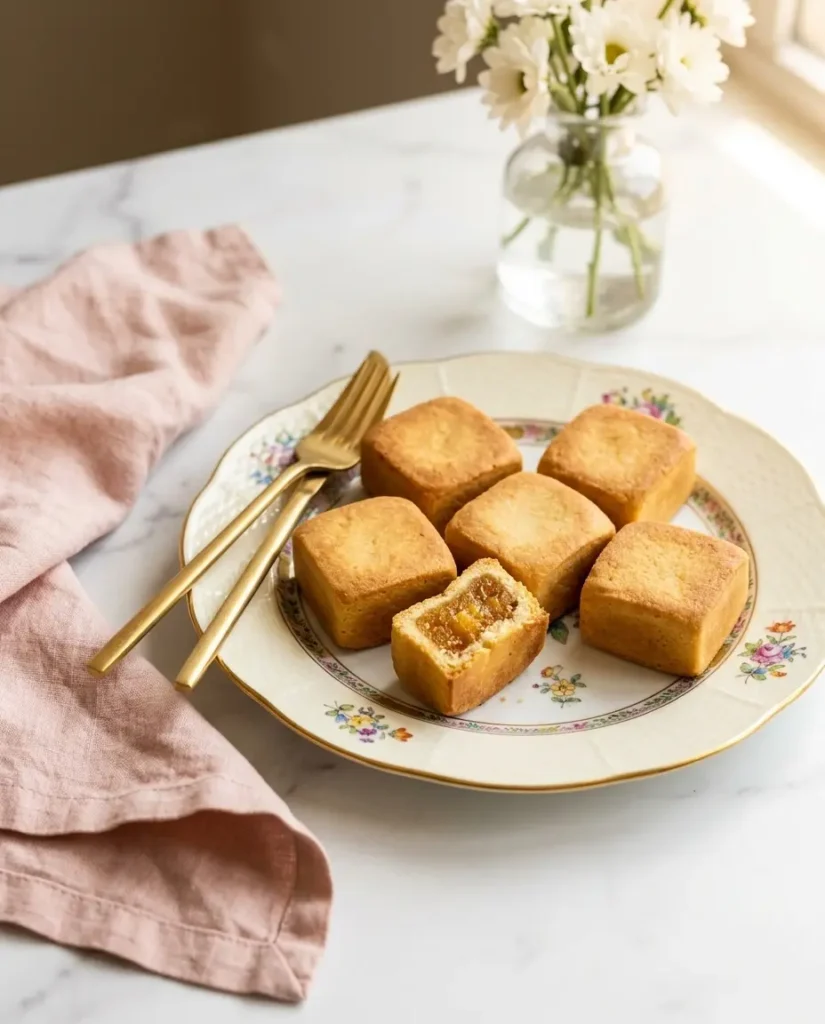
I tested this recipe three times, comparing grated pineapple with blended pineapple so I could judge the filling texture fairly. The grated version gives these pineapple cakes a lightly chewy bite; the blended version makes a smoother pineapple cake that is easier to wrap. The most important variable here is filling texture, not special equipment. Both versions use a tender shortbread pastry, and both work in a regular baking pan.
Here is the scary moment: at 18 minutes, the cakes may look pale and soft. Keep going to the stated time, then let them cool; the butter-rich crust firms as it rests. Feng Li Su (鳳梨酥) is a Taiwanese pastry, though “Chinese pineapple cake” is a common international search term. These pineapple cakes make thoughtful Lunar New Year gifts without turning your kitchen into a full-day food project.
★★★★★ “I made these for Lunar New Year and brought them to my mother-in-law’s — she is Taiwanese and has been making pineapple cakes for thirty years. She asked for my recipe. I have never had that happen before.” — Rebecca T., recipe tester (pre-launch)
Why You’ll Love This Chinese Pineapple Cake
- No mold required: You shape each cake by hand, then use a lined pan and a flat tool to straighten the sides. The method gives you tidy squares without buying specialty equipment.
- A measured filling ratio: Use 30g dough and 15g filling for each piece. That 2:1 balance gives the dough enough thickness to contain the jam while leaving room for a generous pineapple center. A kitchen scale keeps every cake consistent.
- Make-ahead friendly: The crust softens slightly after 24 hours as it rests against the filling, and the flavor settles into a more cohesive bite. Store the finished cakes in an airtight tin at room temperature for up to 5 days.
- Grocery-store ingredients: This recipe uses pineapple, butter, sugar, flour, egg yolks, and milk powder. You do not need maltose, winter melon, or a specialty mold for this home version.
What Is Chinese Pineapple Cake?
Chinese pineapple cake is the common international search name for Feng Li Su (鳳梨酥), a Taiwanese pastry made with a buttery shortbread crust and a sweet-tart pineapple jam filling. The pastry is closer to a filled cookie than to a soft layer cake, even though English translations often call it a pineapple cake.
In Mandarin, 鳳梨酥 is read as Feng Li Su. In Taiwanese Hokkien, pineapple is commonly pronounced ông-lâi, a sound associated with the phrase “prosperity arriving.” That wordplay helps explain why Taiwanese pineapple cakes are popular gifts for Lunar New Year, weddings, and housewarmings. The food carries a warm wish for good fortune, not just a sweet filling.
Traditional Taiwanese pineapple cakes are often baked in rectangular metal molds. This no-mold version uses firm, cooled jam and a dough wrapper thick enough to hold it. Lowering the filling’s moisture reduces steam during baking, so the crust is less likely to split or turn soggy. It will not have the sharp factory-made edges of every molded version, but it gives home bakers a practical shape with ordinary kitchen tools.
Key ingredients
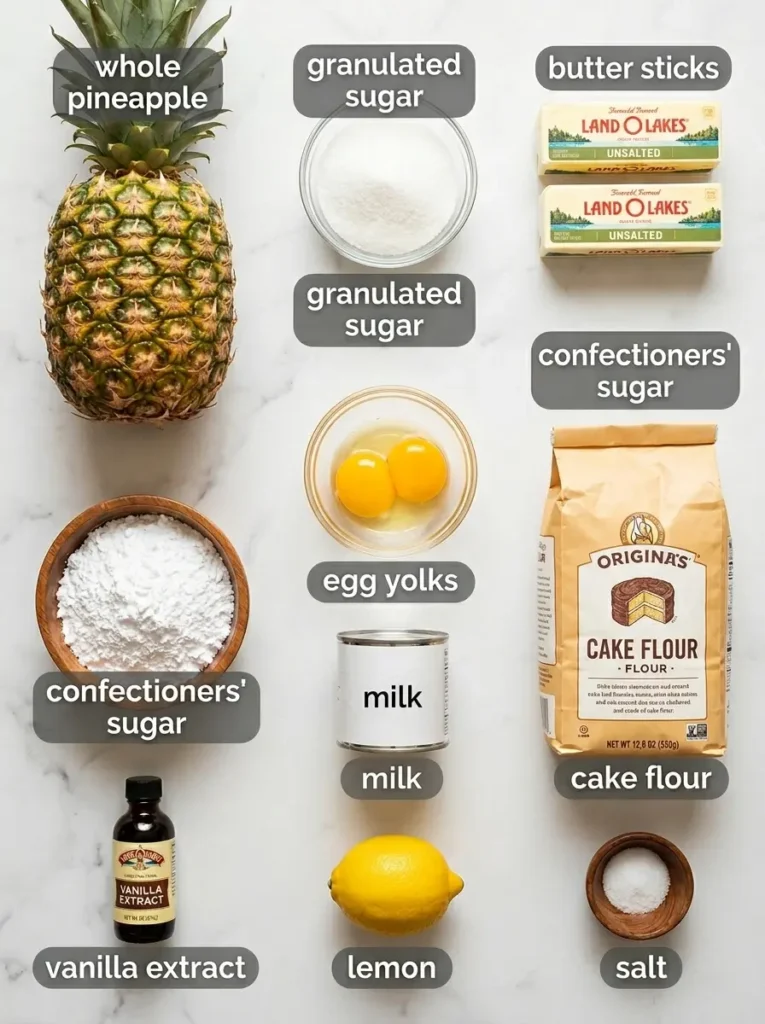
These are the main ingredients for this Chinese pineapple cake recipe. Measure the ingredients before you start, especially the flour and butter; small changes in moisture can affect the dough and the filling. Full quantities appear in the recipe card below.
For the pineapple jam filling:
- 1 medium fresh pineapple (about 3 cups grated) — Fresh pineapple gives the filling a brighter, tangier flavor and a lightly fibrous texture. Grate the flesh and core on the coarse side of a box grater. The honest trade-off is that canned pineapple saves peeling and grating time, but its filling is softer and less complex. If you use canned crushed pineapple, drain it very thoroughly before cooking so excess liquid does not leave the jam runny.
- ½ cup granulated sugar — Sugar sweetens the pineapple and helps the cooked mixture become thick and glossy. Start with this amount, then taste the filling after cooking; pineapples vary in natural sweetness.
- 1 tablespoon unsalted butter — Stir this into the hot pineapple jam at the end. Butter adds a smooth, faintly rich finish and helps the filling spread easily while you portion it.
- 1 tablespoon fresh lemon juice — Lemon juice sharpens the pineapple flavor and adds acidity. It supports a clean, balanced filling, but the jam becomes firm mainly because cooking removes water, not because the lemon juice acts as a standalone thickener.
For the shortbread crust:
- 1 cup (2 sticks / 225g) unsalted butter, room temperature — Use butter that feels soft enough to dent with a finger but is not shiny or melting, usually about 65–68°F. Soft butter creams evenly with the sugar. It also coats some of the flour, which limits gluten formation and helps the crust stay tender.
- ½ cup confectioners’ sugar — Powdered sugar dissolves more readily than granulated sugar, so the dough stays smooth rather than gritty. Its fine texture supports the delicate, crumbly crust.
- 2 egg yolks — Yolks add fat, moisture, and emulsifiers. The fat keeps the dough flexible during shaping, while the emulsifiers help the butter and liquid combine into a cohesive mixture. Do not replace the yolks with whole eggs; the added white can make the dough firmer.
- 1¾ cups (220g) cake flour — Cake flour contains less protein than all-purpose flour, so it forms less gluten when mixed. That gives the crust a softer bite instead of a tough, bready texture.
- 3 tablespoons full-fat milk powder — Milk powder adds milk solids, subtle sweetness, and proteins that help the crust brown evenly in the oven. Use dry powder rather than liquid milk, which would add extra moisture to the dough.
- 1 teaspoon vanilla extract — Vanilla rounds out the butter and pineapple flavors.
- ¼ teaspoon salt — Salt keeps the sugar and fruit from tasting flat.
Ingredient note: If you cannot find cake flour, make a substitute: for every 1 cup of cake flour, use ¾ cup all-purpose flour + 2 tablespoons cornstarch. Whisk them together thoroughly before measuring the amount needed for this recipe. The crust will be slightly firmer because all-purpose flour contains more protein, but the substitution keeps the dough workable.
Equipment You’ll Need
- Box grater or food processor — Use a box grater for a lightly fibrous pineapple filling or a food processor for a smoother paste. The grater leaves fruit fibers intact, while the processor breaks the pineapple into a more even mixture.
- Wide non-stick pan or skillet — A wide pan gives the pineapple more surface area, so water evaporates steadily during cooking. This helps shorten the cooking time compared with a narrow saucepan and makes it easier to see when the jam pulls away from the pan.
- Stand mixer or hand mixer — Use either tool to cream the butter and sugar. A hand mixer works well; just scrape the bowl once or twice so the mixture becomes evenly pale and fluffy.
- 9×9 inch or 9×13 inch baking pan (foil or metal) — Line the pan with parchment for the no-mold method. A sturdy foil pan works, but a metal pan is easier to grip when you press the filled balls into an even shape.
- Kitchen scale — A scale makes the 30g dough and 15g filling portions consistent. It also keeps the crust thick enough to contain the jam without making the cakes heavy.
Controlling the Pineapple Filling Texture
The most important variable in these pineapple cakes is filling texture. I compared it in three tests: test 1 used grated fresh pineapple, test 2 used blended fresh pineapple, and test 3 repeated the preferred texture to check that the result stayed consistent. The dough, sugar, butter, pan, oven temperature, and baking time stayed the same.
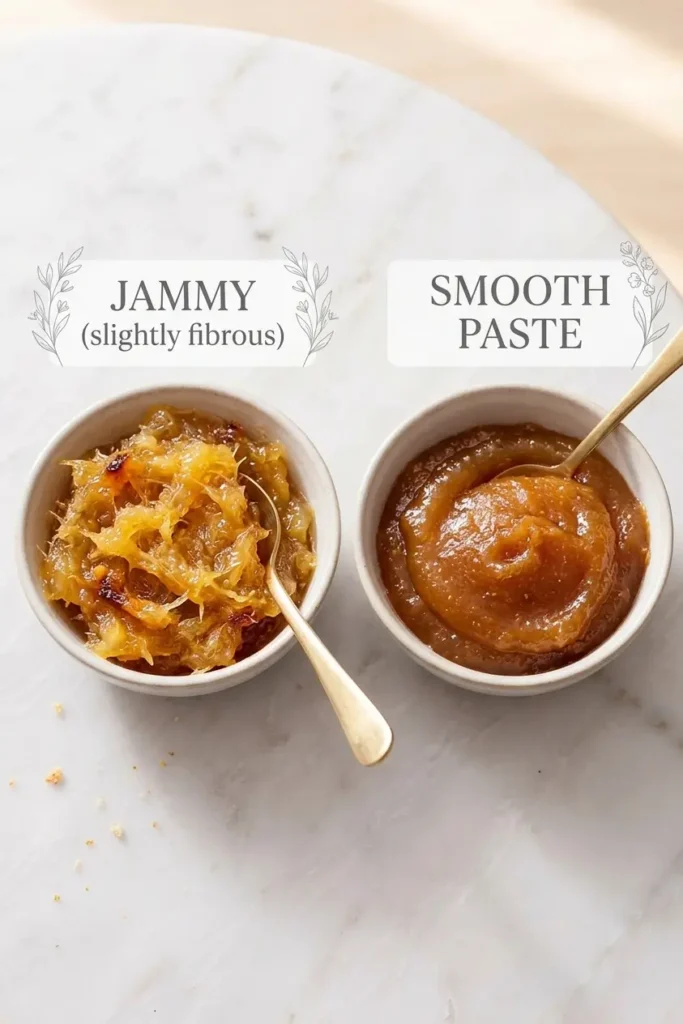
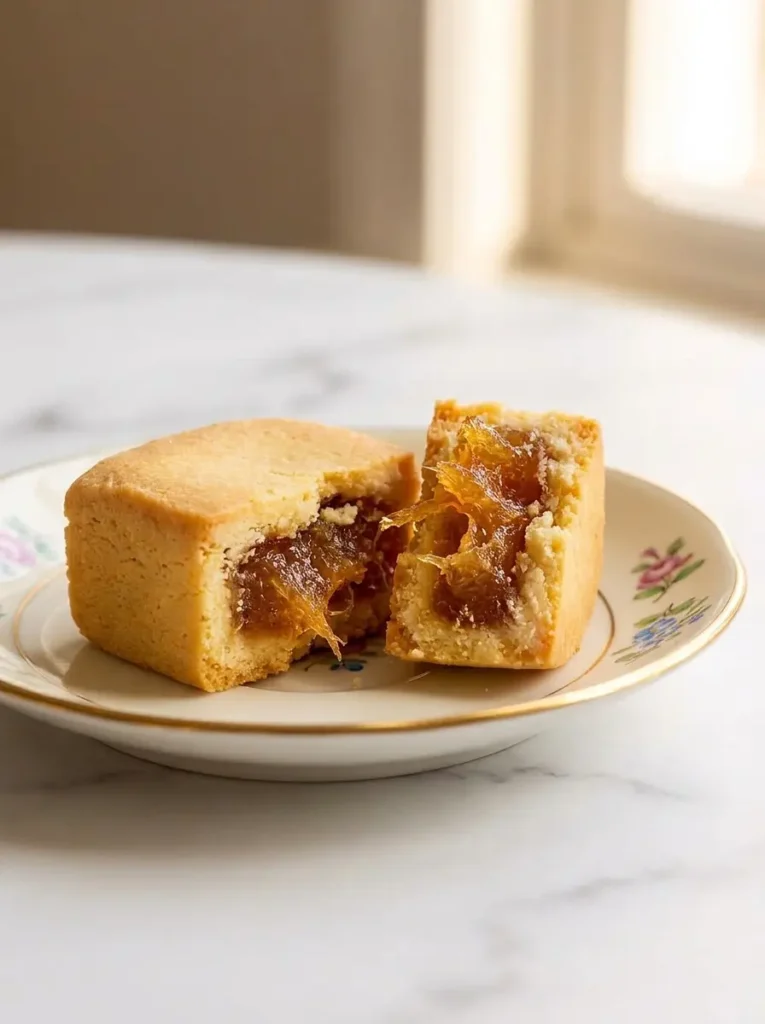
Lightly fibrous jam: Grate the pineapple on the coarse side of a box grater, then cook it over medium-high heat for 20–25 minutes. Once most of the liquid has evaporated, reduce the heat to low and continue cooking for 5–8 minutes. The fibers remain visible, giving the pastry a slightly chewy bite and a brighter fruit texture.
Smooth paste: Blend the pineapple before cooking, then cook it for 30–35 minutes, stirring often. Blending breaks the fruit down and spreads its moisture more evenly, so the filling becomes glossy and easier to wrap around the dough. This version gives the cakes a cleaner cut surface.
For either version, drag a spoon through the hot pineapple jam. The trail should remain visible for several seconds, and the jam should mound slightly on the spoon instead of running off. Do not panic if it looks a little soft at this stage; the filling firms as it cools. Spread it on a sheet or plate for at least 30 minutes before shaping, or chill it in the fridge until firm and slightly tacky. Both textures use the same recipe, and each produces a sturdy filling for this no-mold pineapple cake.
How to Make Chinese Pineapple Cake
Step 1 — Cook the Pineapple Jam
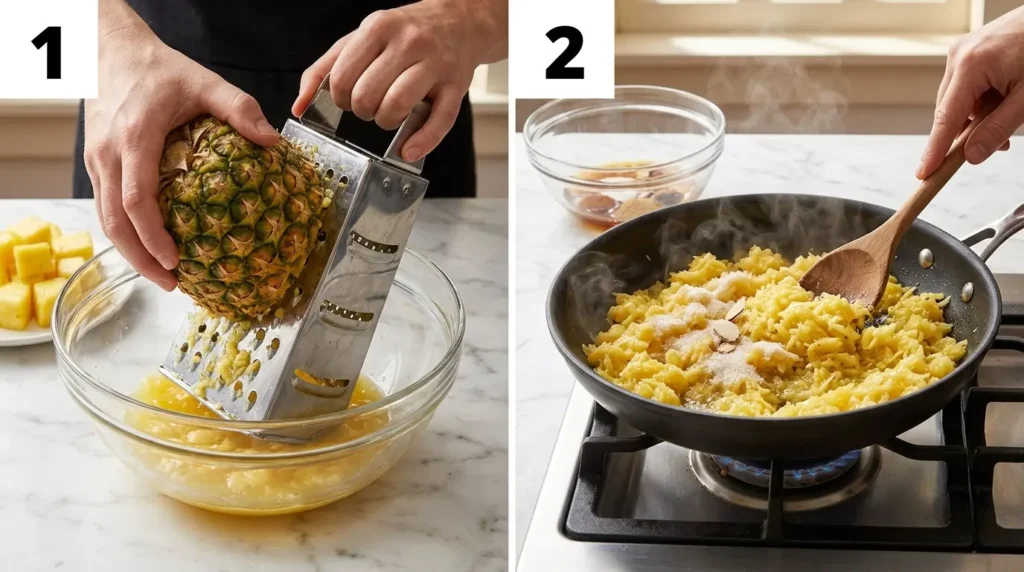
Peel the pineapple and remove every eye. Cut the flesh into manageable pieces, then grate it on the coarse side of a box grater. Include the core; it is firmer than the flesh, but its fibers help the filling thicken as the water cooks away. You should have about 3 cups of grated pineapple with its juice. If you chose the smooth-paste version, blend the pineapple before placing it in the pan.
Put the pineapple and all its juice directly into a wide non-stick pan over medium-high heat. Do not drain fresh pineapple first. That liquid is not a problem; it must evaporate so the fruit flavor becomes concentrated and the finished filling does not leak into the dough. Cook for 20–25 minutes, stirring every few minutes with a heatproof spatula. The mixture will bubble vigorously at first, then become thicker as the moisture leaves.
When most of the liquid has cooked off and the pineapple looks drier, reduce the heat to low. Add the sugar, butter, and lemon juice. Stir constantly for another 5–8 minutes. The butter makes the jam glossy, while the sugar continues concentrating the mixture as the remaining water evaporates. A spoon dragged through the pan should leave a trail that stays visible for several seconds.
Do not use “still bubbling” as your only test; hot jam can look looser than it really is. Lift a spoonful and check that it mounds slightly instead of running straight back into the pan. The color should deepen from pale yellow to warm golden yellow. If the jam flows quickly or fills the spoon trail at once, cook it for 1–2 additional minutes over low heat, stirring constantly.
Transfer the pineapple jam to a plate or shallow tray and spread it into a thin layer. Cool it at room temperature for at least 30 minutes. Cooling matters because the concentrated sugar and natural fruit fibers make the filling firmer as its temperature drops. The jam should feel cool, firm, and slightly tacky before you try to wrap it. If you are short on time, place the tray in the fridge after the first 10 minutes, but do not wrap warm jam; it will soften the dough and push through the crust.
Step 2 — Make the Shortbread Dough
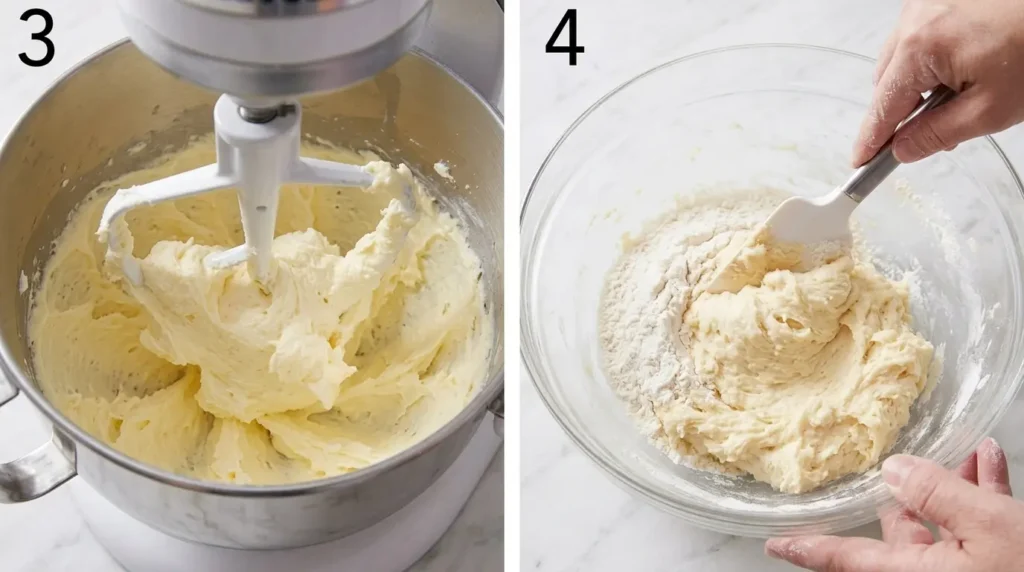
Place the room-temperature butter and confectioners’ sugar in the bowl of a stand mixer or use a hand mixer. Beat on medium speed for 3–4 minutes, scraping the bowl once halfway through, until the butter is pale, fluffy, and noticeably lighter. Creaming disperses the sugar through the butter and holds tiny air pockets in the mixture. Those air pockets help keep the shortbread tender rather than dense.
Add the egg yolks one at a time, beating well after each addition. Wait until the first yolk disappears into the butter before adding the second. The yolks supply fat and emulsifiers, which keep the dough flexible enough to stretch around the filling. Add the vanilla and mix for about 15 seconds.
Sift the cake flour, milk powder, and salt into the bowl. Switch to a spatula and fold the dry ingredients in by hand. Do not continue beating once the flour is added. Flour contains proteins that can develop gluten when worked with moisture and force; too much mixing makes the crust firm instead of crumbly. Fold only until no dry flour remains and the dough looks evenly pale.
The finished dough should feel soft and slightly tacky, but it should hold together when pressed. If it sticks heavily to your fingers or refuses to keep its shape, wrap the dough and refrigerate it for 20 minutes. Chilling firms the butter, which makes the portions easier to handle and helps the finished cakes hold their edges during baking. Do not leave it in the fridge for hours before shaping, because very cold shortbread can crack when you flatten it.
Step 3 — Portion and Wrap
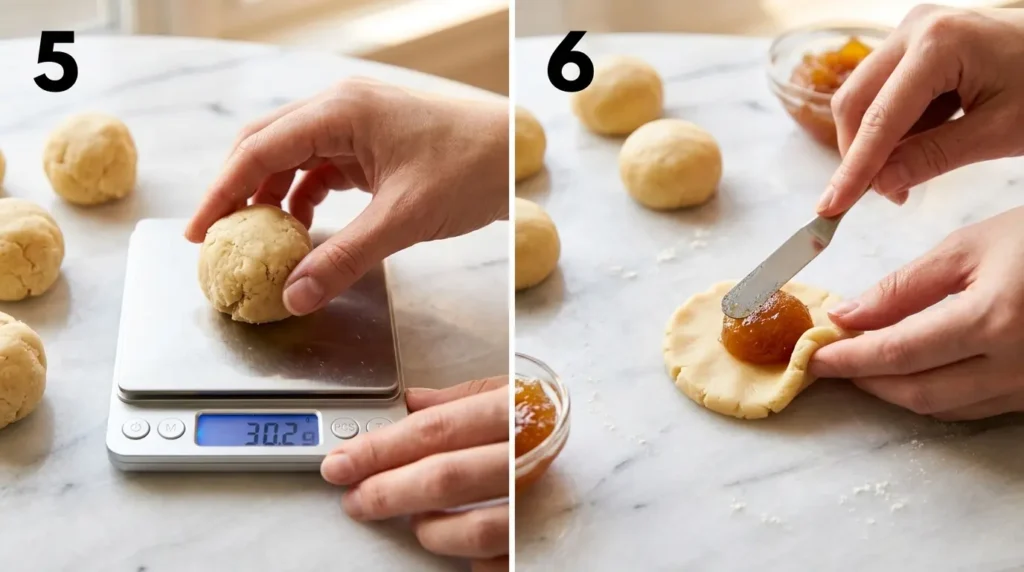
Set a kitchen scale beside your work area. Portion 30g of dough and 15g of cooled pineapple filling for each cake. This 2:1 dough-to-filling ratio gives the wrapper enough thickness to contain the jam while keeping the center generous. Depending on the exact amount of dough and filling produced, the batch makes about 12–15 pieces. Use a tablespoon guide only if you do not have a scale: one heaping tablespoon of dough and one teaspoon of filling is a close estimate, but weighing is more reliable.
Roll each portion of dough into a ball, then flatten it in your palm into a round disc about 3 inches across. Keep the center slightly thicker than the edges if you can; that gives the filling a strong base. Place one 15g portion of pineapple jam in the middle. Bring the dough up around the filling from the bottom, pinching the seam closed as you go. Work gently rather than stretching one spot until it becomes thin.
Roll the filled ball between your palms just long enough to smooth the seam. If the dough cracks, stop pulling it. Let that portion rest at room temperature for 5 minutes, then cup it between warm hands for about 30 seconds and try again. A cold butter-based dough is brittle; a short rest lets it become flexible without turning greasy. If a small crack remains, pinch it closed before shaping.
Place the filled balls in a parchment-lined 9×9-inch or 9×13-inch pan, leaving about 1 inch between them. The smaller pan gives the pieces more support, while the larger pan gives you extra working room. Press each ball into a square or rectangle with the flat bottom of a small glass, a bench scraper, or another straight-sided tool. Aim for a height of about ½ inch. Press evenly rather than crushing the top, so the filling stays centered and the crust remains the same thickness on all sides.
Refrigerate the shaped cakes for 15–20 minutes before baking. This short chill firms the butter again after handling. It reduces spreading and helps the corners stay defined in the oven. If the dough becomes soft while you shape the last few pieces, chill the full pan rather than trying to bake some pieces sooner than others.
Step 4 — Bake
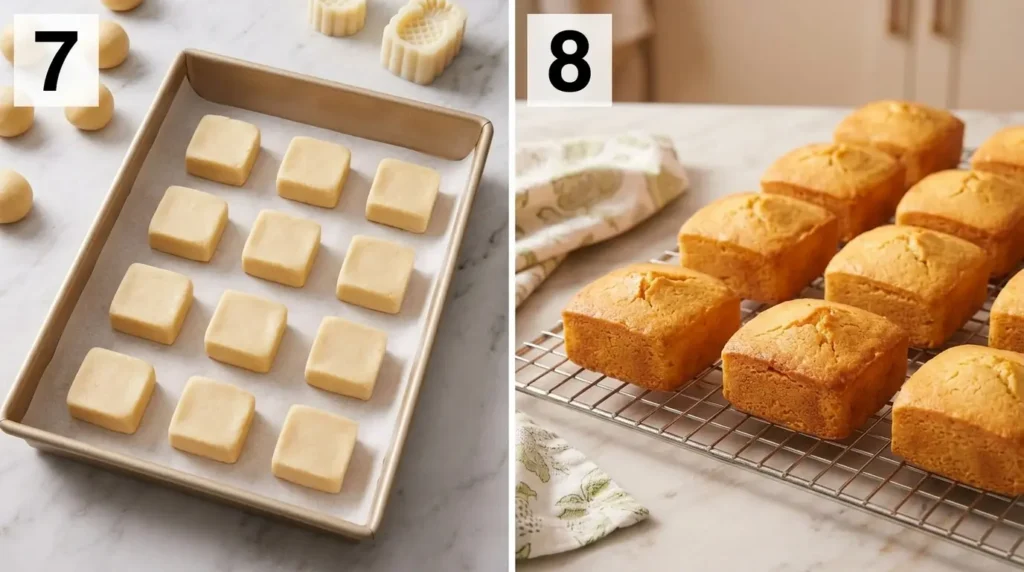
Preheat your oven to 325°F (165°C). Give the oven enough time to reach temperature before the pan goes in; an oven that is still heating can melt the butter before the crust begins to set. The lower baking temperature is deliberate. It gives the dough time to bake through while limiting rapid browning on the surface.
Place the chilled pan on the center rack and bake for 20–22 minutes. The tops should be pale golden, the surfaces should feel dry, and the edges should just begin to catch color. The cakes may look pale and soft at 18 minutes. That is the scary moment, but it is expected. Do not pull them out early, and do not judge the texture while the butter is still hot. Continue baking for the stated 20–22 minutes so the crust sets around the filling.
If your oven browns unevenly, rotate the pan once at the 10-minute mark, moving the back toward the front. Do this quickly so the oven does not lose much heat. Avoid flipping the individual cakes; the shortbread is fragile before it cools, and turning them can disturb the seams or flatten the corners. The center will remain tender because the pineapple filling is already cooked before the cakes enter the oven.
When the baking time ends, leave the cakes in the pan for at least 15 minutes. Freshly baked crust contains melted butter and is easy to break. Resting allows the butter to firm and the crust to support the jam. Once the pieces feel stable, transfer them carefully to a wire rack.
Step 5 — Cool Completely Before Serving
Let the cakes cool at room temperature for at least 1 hour before eating. This is a texture step, not merely a safety step. The crust becomes less fragile, and the pineapple jam thickens enough to stay in the center when you bite through it. Straight from the oven, the filling is hot and the cookie-like crust can crumble around it.
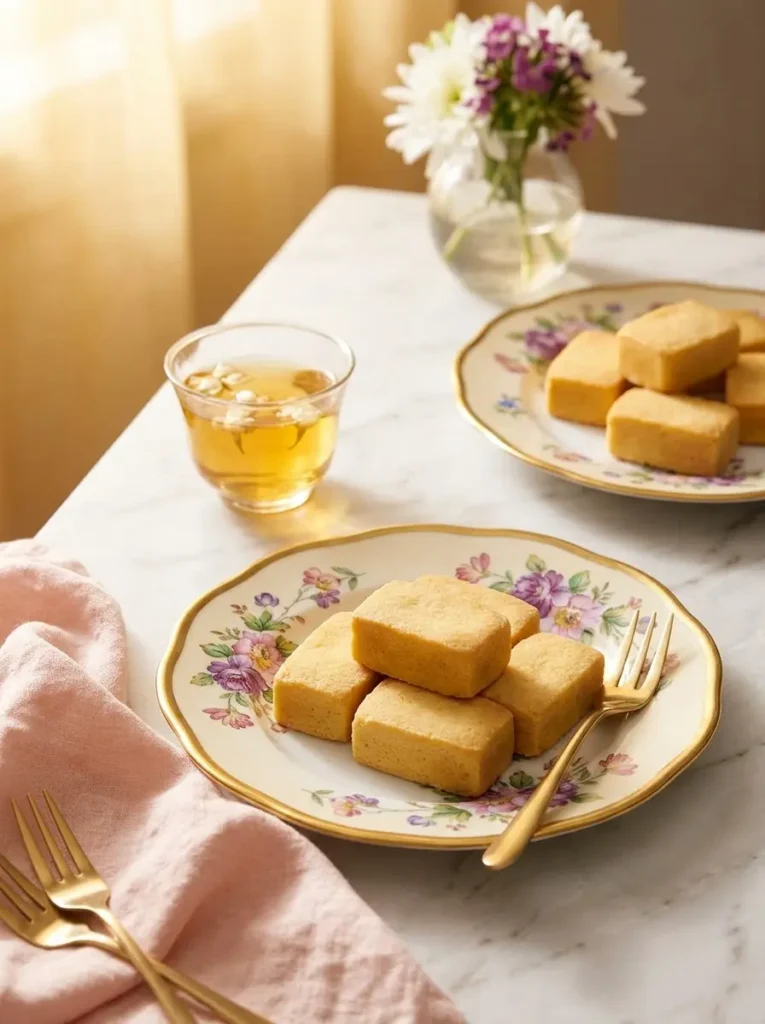
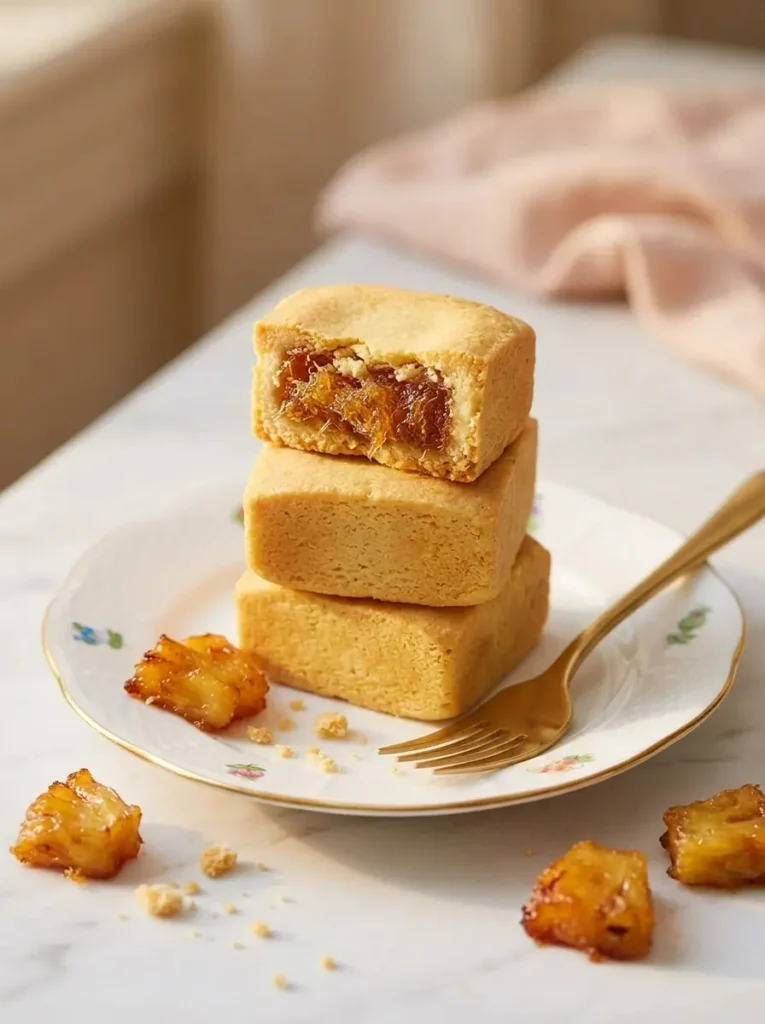
For the cleanest texture, wait until the next day before serving. During that time, a little moisture moves from the jam into the shortbread, softening the crust slightly and bringing the butter and pineapple flavors together. Once completely cool, place the pieces in an airtight container. The finished Chinese pineapple cake should have a tender, crumbly crust, a firm pineapple center, and enough tang to keep the sweetness from feeling heavy.
Pro Tips for Chinese Pineapple Cake
1. Cool the pineapple jam fully before wrapping. Warm jam is sticky and loose, so it can push through the dough and create thin spots. Spread it on a shallow plate and wait until it feels firm and slightly tacky before portioning the filling.
2. Weigh the dough and filling. Use 30g dough and 15g filling for each piece. Consistent portions keep the crust thick enough to hold the pineapple center and help all the cakes bake at the same rate.
3. Give cold dough 5–10 minutes at room temperature. If the dough cracks as you shape it, do not stretch it harder. Cold butter makes the dough brittle; a short rest softens it enough to seal around the filling without adding extra flour.
4. Chill the shaped cakes before baking. Refrigerate the filled pieces for 15–20 minutes after shaping. This firms the butter, so the cakes keep their square edges while the crust begins to set in the oven. Do not flip them during baking because the warm pastry is fragile.
Variations and substitutions
Ingredient substitution — canned pineapple: Use 2 cans (20 oz each) of crushed pineapple. Press it through a fine-mesh strainer until very little juice remains, then cook it for about 15 minutes before adding the sugar, butter, and lemon juice. Canned fruit saves preparation time and works well, but fresh pineapple gives a brighter, more fibrous filling. This is the main flavor trade-off in this recipe.
Dietary — gluten-free version: Replace the cake flour with a 1:1 gluten-free baking flour blend. The crust may be more crumbly and less cohesive, so handle the dough gently when shaping the cakes. I have not personally tested this version, so I cannot promise the same texture or baking time.
Equipment — no mixer: Beat the softened butter and confectioners’ sugar by hand with a wooden spoon for 5–7 minutes, until pale and fluffy. This takes more effort than using a mixer, but it works if the butter is soft enough to press easily with a finger. Add the egg yolks one at a time and fold in the flour mixture with a spatula.
Flavor — salted egg yolk center: For a Taiwanese pineapple variation, place one small cured salted duck egg yolk in the center of each 15g filling portion before wrapping it in dough. Use fully cooked or properly cured yolks from a reliable source, and keep the portion small so the pastry seals completely. The yolk adds a gentle savory note beside the tart pineapple jam, making these cakes a special option for Lunar New Year gifts.
Troubleshooting
Why Did My Dough Crack When I Tried to Wrap the Filling?
Cold dough is the usual cause. When the butter is chilled, it becomes firm and the shortbread dough turns brittle instead of stretching around the filling. Let the portion rest at room temperature for 5–10 minutes, then warm it between your hands for about 30 seconds before shaping the ball again. Work from the bottom upward and pinch small cracks closed as you seal the dough.
Skipped or reduced egg yolks can also leave the dough too fragile. Yolks add fat and emulsifiers, which help the dough bend around the pineapple filling. If you made the dough without the yolks, mix in 1 additional egg yolk, wrap the dough, and refrigerate it for 15 minutes before trying again. The extra yolk is a rescue measure, not a replacement for the two yolks in the recipe. Do not add extra flour to fix cracking; flour can make the crust stiff and harder to seal.
My Pineapple Jam Is Too Runny and Won’t Hold Its Shape.
The pineapple jam needs more cooking time, or the fruit contained more moisture than the test batch. Excess water turns to steam in the oven and can soften the crust or force the filling through a weak seam. Return the jam to a wide pan over low heat and stir constantly for 1–2 minutes at a time. Stop when a spoon dragged through the pan leaves a trail for several seconds and the jam mounds slightly on the spoon instead of flowing off it.
Spread the hot jam on a shallow plate and cool it for at least 30 minutes before portioning. It will firm as it cools, so judge the texture only after it is cool enough to handle. If the filling is still loose after cooling, cook it again rather than trying to hide the problem inside the dough. Follow the canned-fruit directions in the Variations and Substitutions section when using that version; do not add extra flour or cornstarch to the filling.
The Cakes Spread and Lost Their Square Shape.
The dough was probably too warm when the pan went into the oven. As warm butter melts, it can flow outward before the flour structure sets, turning sharp corners into rounded edges. After shaping, refrigerate the formed cakes for 15–20 minutes. Bake them while the dough feels cool and firm, and leave about 1 inch between pieces so spreading does not make them touch.
Press each cake evenly to about ½ inch high with a flat-bottomed glass or bench scraper. A rounded top and thin sides are more likely to spread than a compact square. Check that the oven has reached 325°F (165°C), because a low starting temperature gives the butter more time to melt before the crust sets. Once baked, leave the cakes in the pan for 15 minutes; moving them while hot can damage the shape and fragile cookie crust.
Storage and Make-Ahead
Room temperature: Once completely cool, store the pineapple cakes in an airtight tin or container for up to 5 days. Keep them away from direct heat and sunlight. The crust softens slightly after 24 hours as it absorbs a little moisture from the filling. That is a texture change, not a sign of spoilage, and the pineapple cake is often easier to bite on the second day.
Refrigerator: If your kitchen stays above 75°F, refrigerate the cakes in an airtight container for up to 7 days. The fridge makes the butter-rich crust firm, so let the cakes stand at room temperature for 20–30 minutes before serving. Do not leave them uncovered, because cold circulating air can dry the pastry.
Freezer: Freeze baked cakes in a single layer on a baking sheet until solid, then transfer them to an airtight container. They keep for up to 2 months. Thaw at room temperature for 1 hour, and do not microwave them; rapid heat can make the filling hot while leaving the crust greasy and soft.
Gifting: Package the cakes only after they have cooled completely and reached room temperature. Place parchment or paper liners between layers in a tin or gift box. They are practical homemade gifts for Lunar New Year, weddings, housewarmings, or any occasion when you want to share individually wrapped pieces.
Frequently Asked Questions
Q: What is Chinese pineapple cake made of? A: The crust is a buttery shortbread made with cake flour, confectioners’ sugar, egg yolks, milk powder, and butter. The filling is a pineapple jam cooked with sugar, butter, and lemon juice. The finished pastry is closer to a filled cookie or pineapple shortcake than a soft sponge cake.
Q: Can I make Chinese pineapple cake without a mold? A: Yes. This recipe uses hand shaping, a flat-bottomed glass or bench scraper, and a lined baking pan. Chill the shaped cakes for 15–20 minutes before they go into the oven so the butter firms and the sides hold their shape.
Q: What is the difference between fresh and canned pineapple? A: Fresh pineapple gives a brighter, more tart flavor and a lightly fibrous filling. Canned pineapple is faster and convenient, but the cooked filling is softer and less complex. Follow the draining instructions for the canned version before making the jam.
Q: Why is my crust not crumbly enough? A: Check that the butter was soft enough to cream, that you used cake flour or the stated substitute, and that you stopped mixing as soon as the flour disappeared. Overworking the dough develops gluten and makes the crust firmer. Also avoid adding extra flour to a sticky dough before chilling it.
Q: Can I make these ahead? A: Yes. Store the completely cooled cakes in an airtight tin at room temperature for up to 5 days. The crust softens slightly after 24 hours as it rests against the filling, which is a texture change rather than spoilage. For a New Year gathering or gift, make them 1 day ahead.
Q: How many pineapple cakes does this recipe make? A: The 30g dough and 15g filling portions make about 12–15 cakes, depending on the final amount of dough and pineapple jam. Weighing each portion helps the pieces bake at the same rate.
Q: How should I measure the cake flour? A: Weigh 220g for the recipe. If you are using cups, spoon the flour into a dry measuring cup and level the top without packing it down. Too much flour makes the dough dry and can cause the pastry to crack around the filling.
Q: Can I prepare the pineapple jam ahead? A: Yes. Cool the jam completely, place it in a covered container, and refrigerate it until firm. Bring it out long enough to portion it, but do not wrap warm jam. If the center leaks during baking, the jam was likely too moist, too warm, or not sealed inside the dough.
Q: Can I freeze the dough or finished cakes? A: I recommend freezing the baked cakes rather than the unbaked dough. Freeze the cooled pieces in a single layer, transfer them to an airtight container, and use them within 2 months. Thaw at room temperature for 1 hour; do not microwave them.
Q: Is Chinese pineapple cake the same as Taiwanese pineapple cake? A: Feng Li Su originated in Taiwan, so “Taiwanese pineapple cake” is the more precise cultural name. “Chinese pineapple cake” is also used in international recipe searches and home baking. Taiwanese pineapple cakes are often associated with Lunar New Year gifts, good fortune, and a buttery pastry around a cooked pineapple center.
More Recipes You’ll Love
- My foolproof cannoli poke cake uses a similar make-ahead strategy, so it is handy when you want a dessert that can rest before serving.
- The gluten free german chocolate cake recipe uses a buttery shortbread base and gives you another home-baking project to try.
- Try the choco chips cup cake next when you want a different recipe with familiar ingredients.
Try this no-mold method, then tell me whether you preferred the lightly fibrous pineapple jam or the smooth paste version.
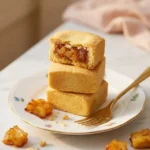
Foolproof Chinese Pineapple Cake (Feng Li Su / 鳳梨酥)
Ingredients
Pineapple jam filling:
- 1 medium fresh pineapple about 3 cups grated, or 2 cans crushed pineapple, well-drained
- ½ cup granulated sugar adjust to taste
- 1 tablespoon unsalted butter
- 1 tablespoon fresh lemon juice
Shortbread crust:
- 1 cup 225g / 2 sticks unsalted butter, room temperature
- ½ cup 60g confectioners’ sugar, sifted
- 2 large egg yolks room temperature
- 1 teaspoon vanilla extract
- 1¾ cups 220g cake flour, sifted
- 3 tablespoons full-fat milk powder
- ¼ teaspoon salt
Instructions
Make the pineapple jam:
- Peel and grate the fresh pineapple on the coarse side of a box grater. Include the core. You should have about 3 cups with juice.
- Place the grated pineapple and all its juice into a wide non-stick skillet over medium-high heat. Cook, stirring occasionally, for 20–25 minutes until most moisture has evaporated.
- Reduce to low heat. Add sugar, butter, and lemon juice. Stir constantly for 5–8 minutes until the jam is thick and holds a trail when you drag a spoon through it. Color will deepen to amber-gold.
- Spread on a plate to cool completely — at least 30 minutes, or refrigerate for 20 minutes to speed up.
Make the shortbread crust:
- Beat room-temperature butter and confectioners’ sugar on medium speed for 3–4 minutes until pale and fluffy.
- Add egg yolks one at a time, beating well after each.
- Add vanilla extract and mix.
- Sift in cake flour, milk powder, and salt. Fold in by hand with a spatula until just combined. Do not overmix.
- If dough is sticky, refrigerate for 20 minutes.
Assemble and bake:
- Preheat oven to 325°F (165°C). Line a baking pan with parchment.
- Portion 30g dough and 15g jam for each cake (or 1 heaping tablespoon dough + 1 teaspoon jam).
- Flatten the dough in your palm into a 3-inch disc. Place jam in the center. Bring dough up around the filling and pinch firmly to seal. Roll smooth.
- Place in the lined pan. Press each into a square shape using the flat bottom of a small glass.
- Refrigerate shaped cakes for 15–20 minutes before baking.
- Bake 10–11 minutes. Flip each cake with a thin spatula. Bake another 10–11 minutes until pale golden-brown.
- Cool in pan for 15 minutes. Transfer to wire rack and cool completely — minimum 1 hour before eating.
Notes
- These taste best on day 2. Make them ahead whenever possible.
- Dough cracking = dough is too cold or no egg yolks. Fix: warm to room temperature and add an extra yolk if needed.
- Runny jam = needs more cooking time. Return to pan over low heat and cook until it holds a trail.