Foolproof Texas Roadhouse Onion Blossom

The first time I tried to make a Texas Roadhouse onion blossom at home, I cut straight through the root and ended up with a pile of loose onion rings instead of a blossom. The second attempt held together, but half the petals never separated — they just sat there, a soggy clump under a shell of fried breading. If you’ve had the same problem, you’re not alone. The whole dish lives or dies on two things: how you cut the onion, and how the coating clings once it hits hot oil.
I tested this four times, changing one variable each round — the cut depth, the soak time, a single dredge versus a double dredge, and the frying temperature. The version below is the one that came out of the fryer looking like the appetizer at the restaurant: petals fanned out fully, coating crisp all the way to the tip, no raw onion taste in the center.
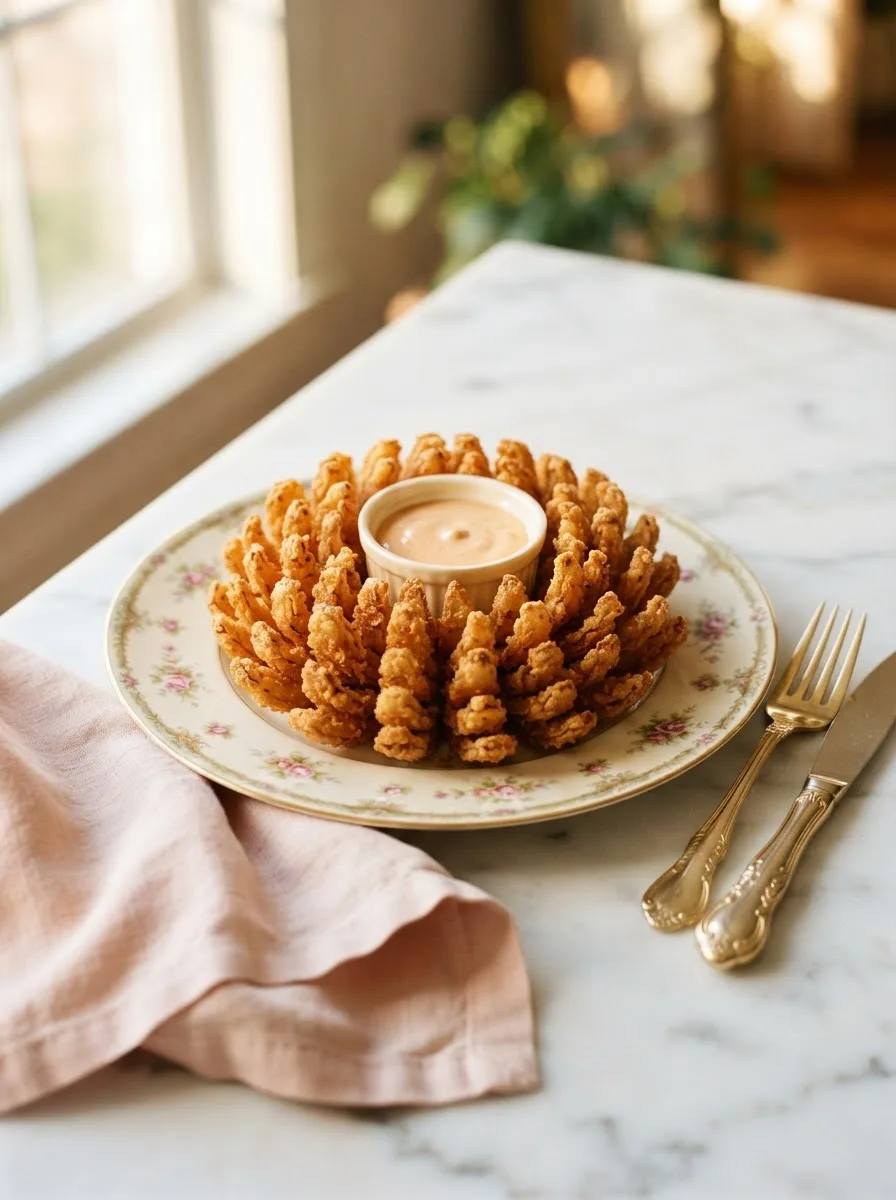
What makes this version different from most copycat attempts online is the double dredge. A single pass through seasoned flour gives you a thin, patchy shell that falls off in the fryer. Dredging twice — flour, egg wash, flour again — builds a coating thick enough to survive the oil and shatter when you bite into it, the same way the restaurant version does.
★★★★★ “I’ve tried three other ‘copycat’ versions online and this is the first one where the petals actually separated into a full bloom instead of a clump. The double dredge tip alone was worth it.” — Danielle R., recipe tester (pre-launch)
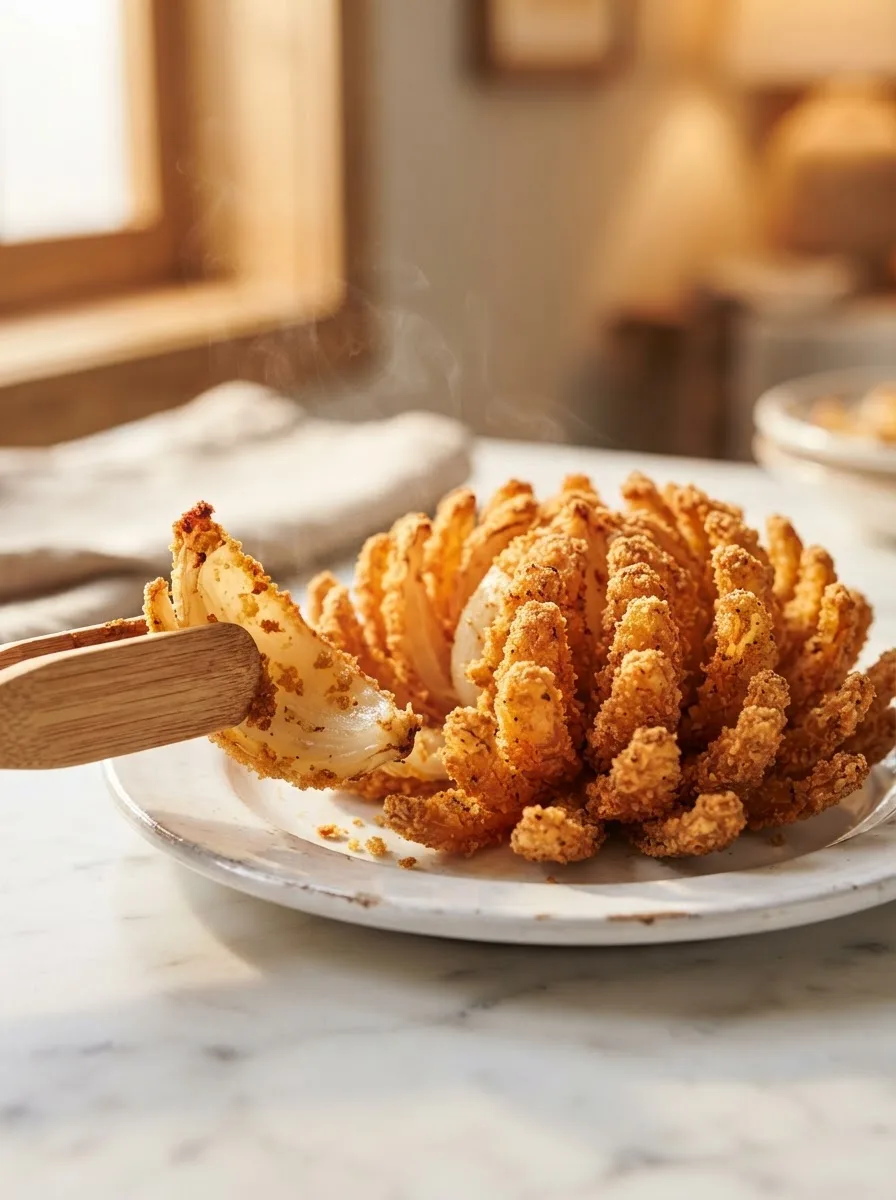
Why You’ll Love This Texas Roadhouse Onion Blossom
- A full, even bloom every time: The cutting method below (leaving the right amount of root intact) is the single biggest factor in whether your onion fans out or falls apart, and I’ll walk you through exactly how deep to cut.
- A coating that doesn’t fall off in the oil: The double dredge — flour, egg wash, flour again — builds a shell that clings and crisps instead of sliding off the second it hits hot oil.
- The real copycat dipping sauce: Mayo, ketchup, horseradish, and a specific ratio of cayenne to paprika get you close to the restaurant’s signature orange-tinted sauce, not a generic ranch swap.
- No deep fryer required: A deep pot and a thermometer do the same job. I tested this in a plain stockpot, no special equipment needed.
Key Ingredients
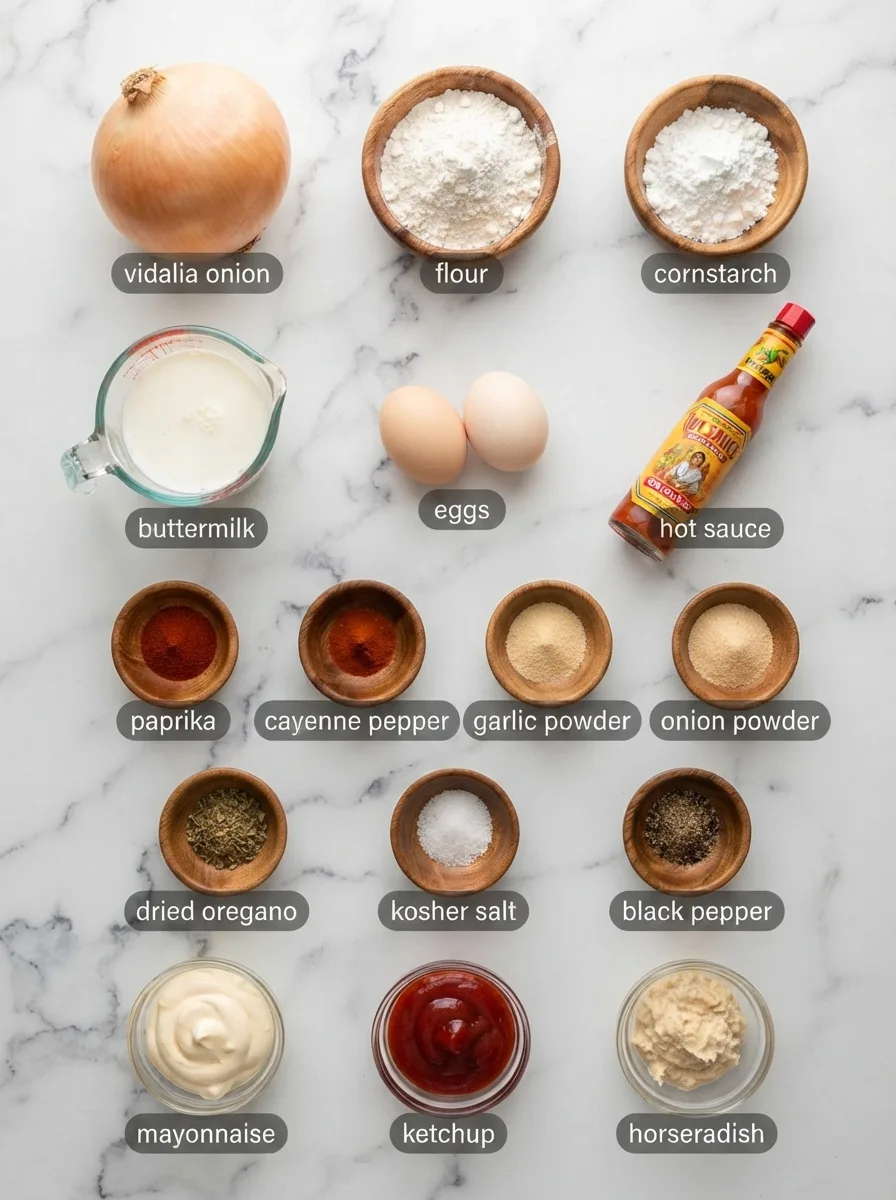
Sweet Vidalia onion (1 large, 4–5 inches wide). This is the most important ingredient decision you’ll make. Sweet onions like Vidalia or Walla Walla have a milder bite and a slightly looser, less rigid layer structure than yellow storage onions — which means the petals separate more easily when you cut and bloom them. A regular yellow onion works in a pinch, but the layers are denser and tend to hold together in a tighter clump.
Buttermilk + hot sauce (soak). Soaking the cut onion in buttermilk spiked with hot sauce does two things: the acidity mellows the onion’s sharpness, and the thin liquid gets into every crevice between the petals so the flour actually has something to grip onto. Skip the soak and the flour slides right off the smooth onion skin.
All-purpose flour + cornstarch (dredge). Straight flour fries up dense. Cutting it with cornstarch (about 1 part cornstarch to 4 parts flour) gives you a lighter, crisper shell — the same trick that makes fried chicken skin shatter instead of feeling like bread. If you’re gluten-free, a 1:1 GF flour blend works, though the shell will be slightly more delicate.
Paprika, cayenne, garlic powder, onion powder, oregano. This is the seasoning backbone that makes the coating taste like something instead of just crunchy flour. Paprika is for color and a mild sweetness, cayenne is for heat, garlic and onion powder round out the savory base, and oregano is the ingredient people usually forget — it’s what gives the coating a faint herbal note that reads as “restaurant” instead of “homemade.”
Mayonnaise, ketchup, horseradish (dipping sauce). The restaurant’s sauce is not just spicy ranch — it’s a mayo-and-ketchup base with horseradish for sharpness and cayenne for heat. Prepared horseradish (the jarred kind, not horseradish sauce) gives the sharpest, cleanest bite.
Ingredient Note: Use a sweet onion, not a storage yellow onion, if you can find one. In my second test, I ran the exact same recipe side by side with a yellow onion and a Vidalia — the Vidalia’s petals fanned open almost completely on their own after cutting, while the yellow onion needed to be forced open by hand and two petals tore.
Equipment You’ll Need
- Sharp paring knife — you need control more than length here; a long chef’s knife makes the shallow root cuts harder to judge.
- Large pot or Dutch oven (at least 4 quarts) — for frying. A tabletop deep fryer works too, but isn’t necessary.
- Instant-read or clip-on candy thermometer — non-negotiable for this recipe. Guessing oil temperature is the fastest way to end up with a raw center or a burnt shell.
- Spider strainer or slotted spoon — for lowering the onion into the oil and lifting it back out without breaking the petals.
- Wire rack set over a baking sheet — for draining. Paper towels work, but they trap steam against the bottom petals and soften the coating there.
Controlling the Bloom: How Deep You Cut the Onion
The single biggest variable in this recipe isn’t the seasoning or the oil temperature — it’s the cut. I tested three cutting depths on identical onions, same size, same brand, cut into 16 wedges each: leaving ¾ inch of root intact, leaving ½ inch, and leaving ¼ inch.
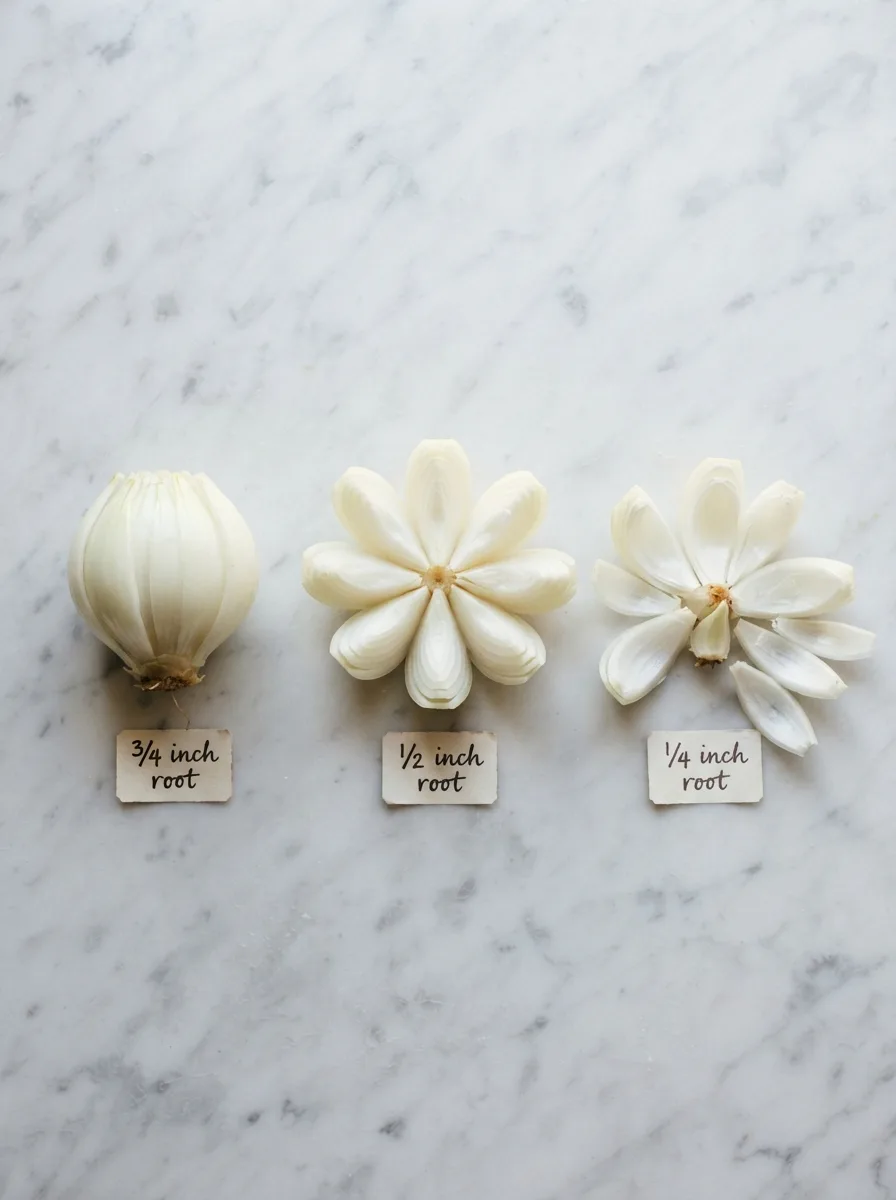
¾ inch root left intact: The petals barely opened even after soaking. Too much root holds the layers locked together, and you end up frying something closer to a whole onion than a blossom.
¼ inch root left intact: Several outer petals detached completely during the soak and fell apart entirely in the fryer, leaving loose, greasy onion strings at the bottom of the pot.
½ inch root left intact — the winner: The petals fanned open fully during the buttermilk soak on their own, with no forcing needed, and every wedge stayed attached to the base. This is the depth used in the recipe below, and it’s the one detail that makes or breaks the whole dish.
How to Make Texas Roadhouse Onion Blossom
Before you start: Take the onion out and let it sit at room temperature for 15 minutes — cold onions are more brittle and crack instead of bending open. Have your oil at 325°F before you start dredging, since it needs time to come up to temperature.
Step 1 — Cut the Onion into a Blossom
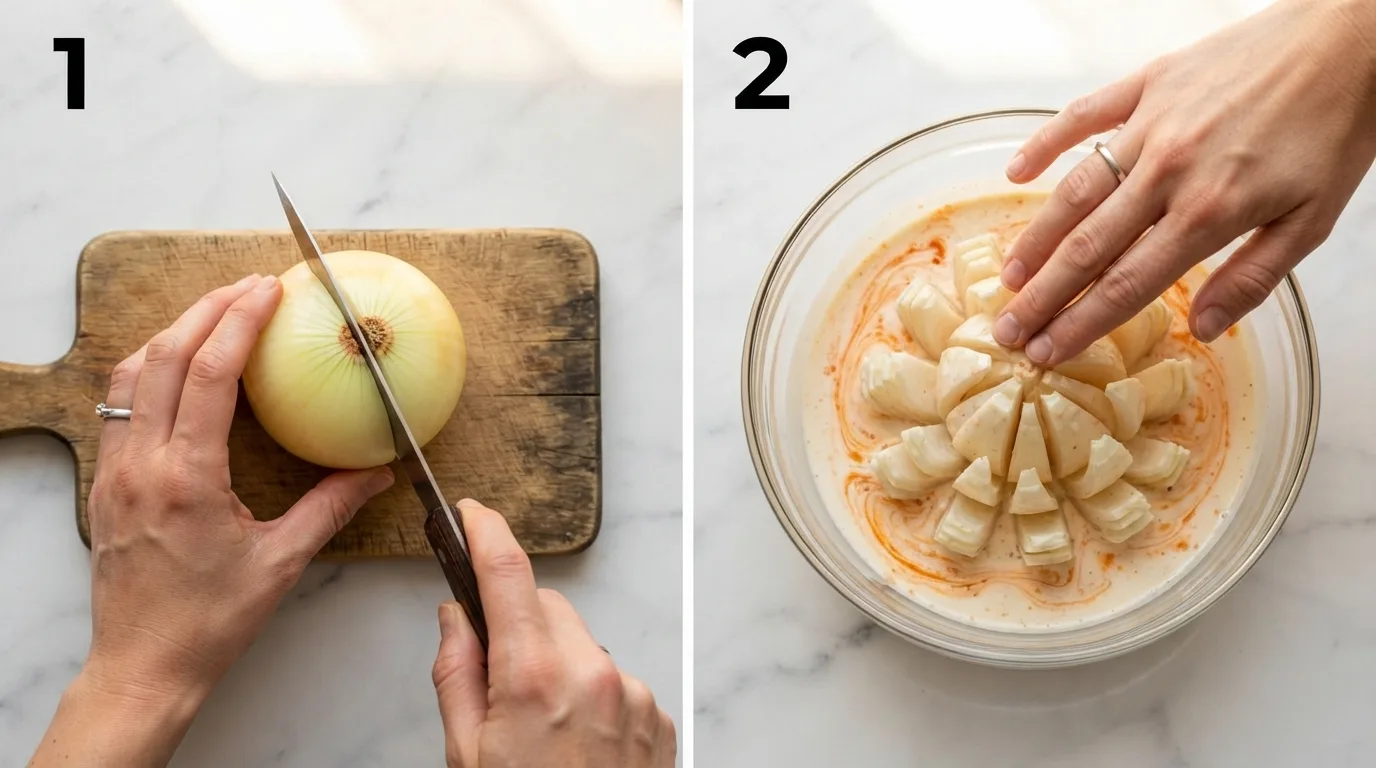
Slice about ½ inch off the top of the onion (the stem end) and peel away the papery skin, leaving the root end intact. Set the onion root-side down and, starting about ½ inch from the root, cut straight down through the onion to make a wedge — 12 to 16 cuts total, spaced as evenly as you can. Stop each cut ½ inch above the root; if you cut all the way through, the petal detaches.
Step 2 — Soak in Spiced Buttermilk
Whisk 2 cups buttermilk with 1 tablespoon hot sauce in a bowl large enough to submerge the onion. Set the onion cut-side down into the buttermilk, then turn it root-side down and gently press the petals outward with your fingers to help them open. Let it soak for at least 30 minutes at room temperature. You’ll see the petals loosen and fan out further the longer it sits — this is the acid working on the onion’s cell walls, softening the connective tissue between layers.
Step 3 — Mix the Seasoned Flour
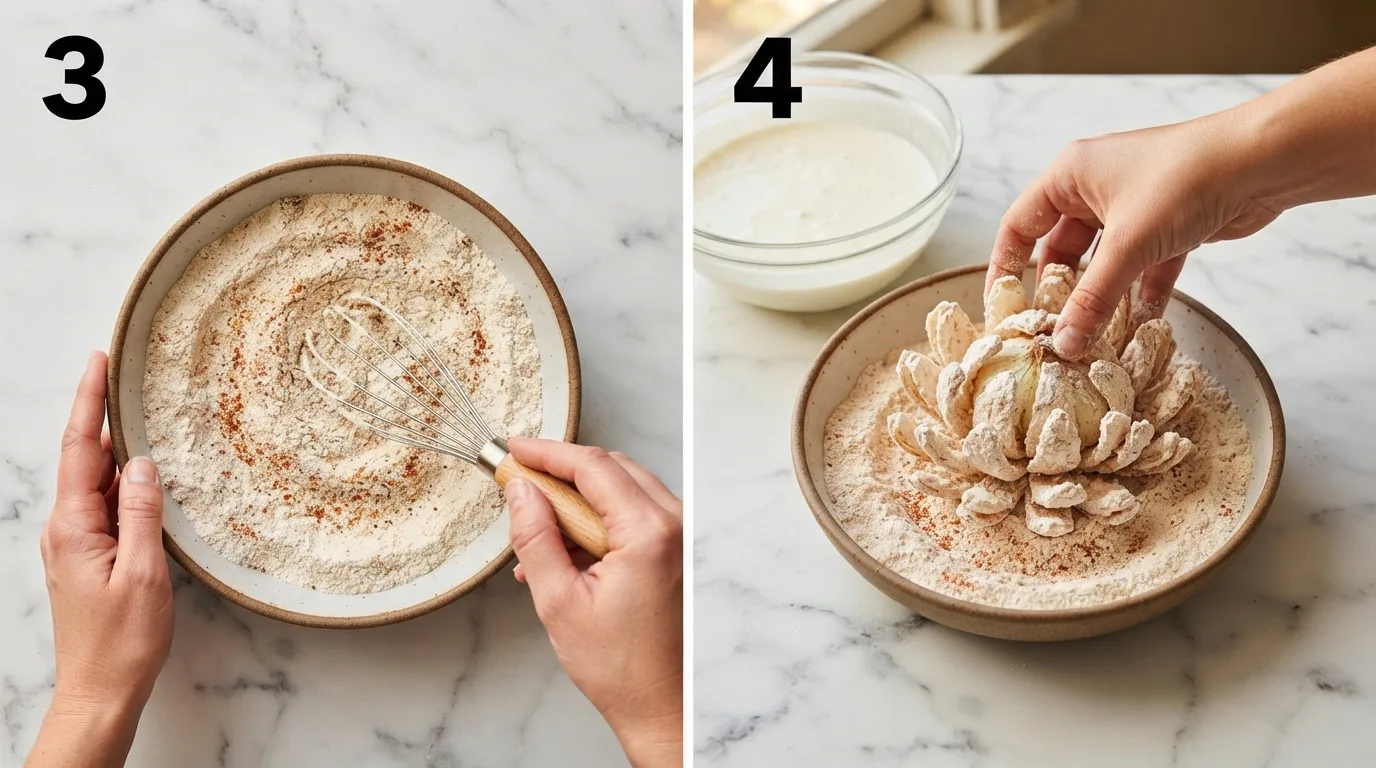
In a large bowl, whisk together 2 cups all-purpose flour, ½ cup cornstarch, 1 tablespoon paprika, 1 teaspoon cayenne, 2 teaspoons garlic powder, 2 teaspoons onion powder, 1 teaspoon dried oregano, 1½ teaspoons kosher salt, and ½ teaspoon black pepper. Whisk thoroughly — clumps of undissolved spice mean uneven flavor in the final coating.
Step 4 — Double-Dredge the Onion
Lift the onion from the buttermilk, letting the excess drip off for a few seconds, then set it into the flour mixture. Use your fingers to work the flour down between every petal, lifting and separating them as you go. Lift the onion out, shake off the excess, then dip it back into the buttermilk for 10 seconds, and dredge in the flour a second time. This second pass is what gives the coating enough thickness to survive the oil without falling off in patches — a single dredge fries up thin and uneven, with bare spots where the petals overlap.
Step 5 — Chill Before Frying
Place the double-dredged onion on a wire rack and refrigerate, uncovered, for 20 minutes. This step matters more than it looks like it should: the chilling time lets the flour hydrate slightly and set against the onion, which helps the coating hold together as a solid crust instead of shedding loose flour into the oil.
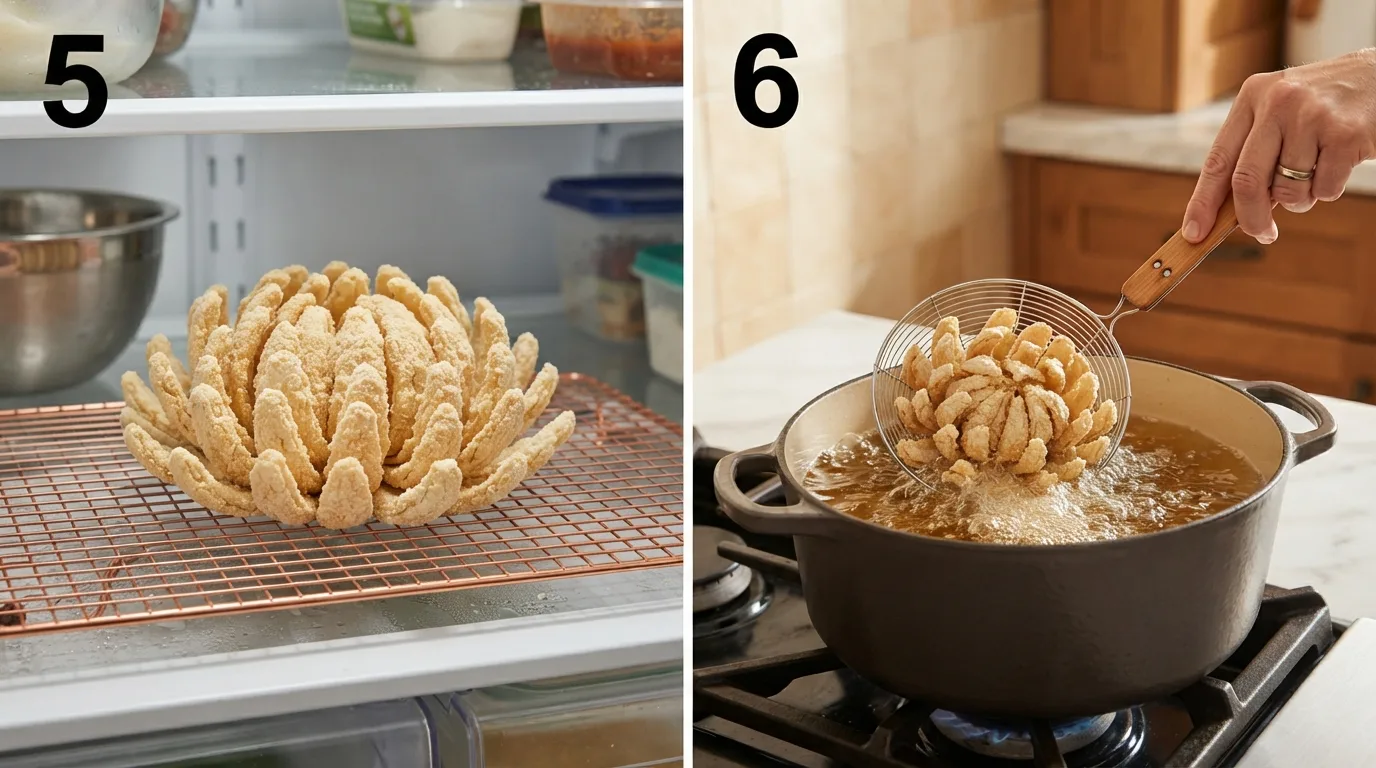
Step 6 — Fry Until Golden
Heat at least 3 inches of neutral oil (vegetable or canola) to 350°F in your pot. Lower the onion in petal-side down using the spider strainer, then flip it root-side down after about 1 minute so the petals bloom fully in the oil. Fry for 4 to 6 minutes total, until deep golden brown all over. Watch the color, not the clock — a pale golden onion needs another minute; a coating that’s gone past medium-brown will taste bitter.
Step 7 — Drain, Bloom, and Serve
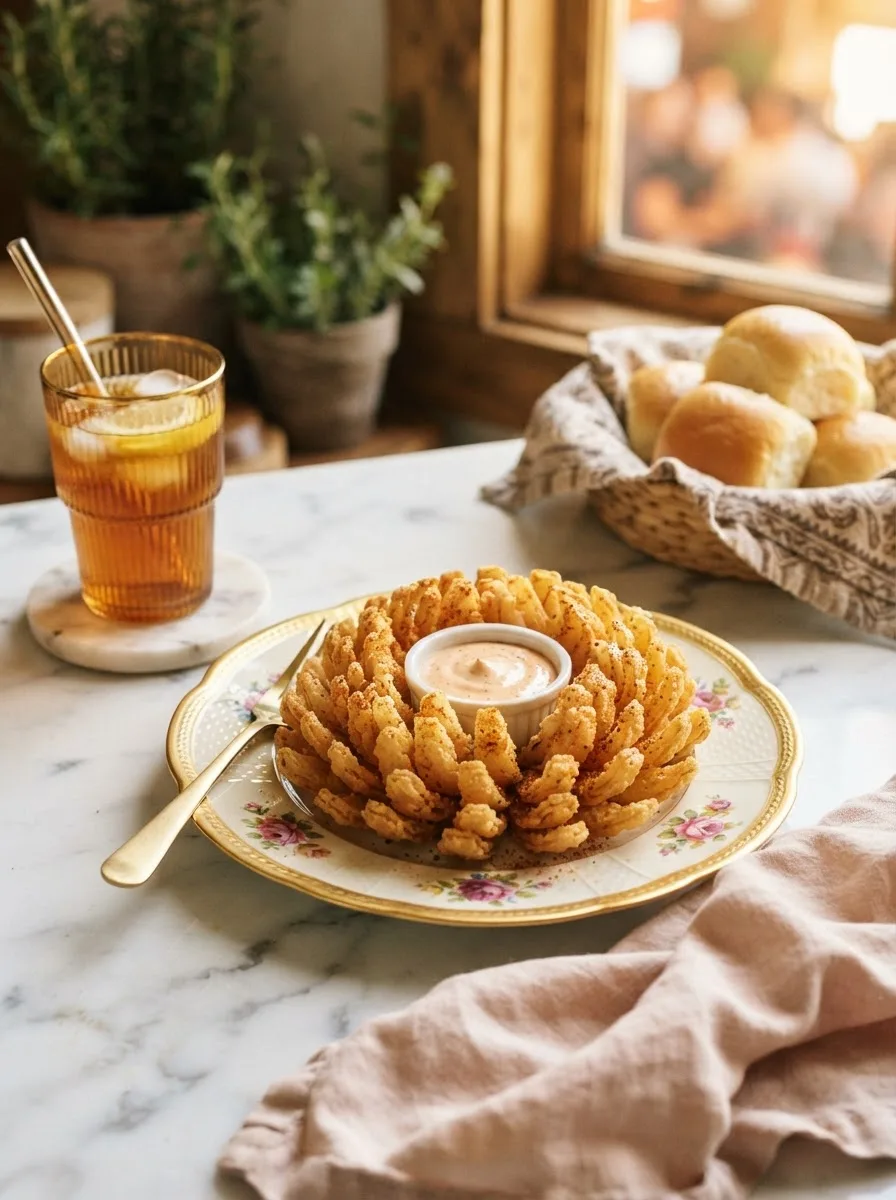
Lift the onion out with the spider strainer and set it root-side down on the wire rack to drain for 2 minutes. Once it’s cool enough to handle, use your fingers to gently pull the outer petals open wider — this last push is what gets you the full, flower-like bloom you see in the restaurant photos. Set it on a plate with the dipping sauce spooned into the center, right where the petals meet, and serve immediately while the coating is still audibly crisp.
Pro Tips for Perfect Texas Roadhouse Onion Blossom
Tip 1: Don’t skip the second dredge. I tested a single dredge against a double dredge side by side. The single-dredge onion had bald patches where the coating slid off in the oil; the double-dredge onion was evenly crisp on every petal. The extra 90 seconds of dipping is the highest-leverage step in this whole recipe.
Tip 2: Fry at 350°F, not higher. Going hotter to save time browns the coating before the inner petals cook through, leaving a raw, sharp onion taste at the core. Going lower than 325°F lets the coating soak up oil and turn greasy instead of crisp.
Tip 3: Cut your wedges as evenly as you can. Uneven wedge widths mean some petals fry faster than others — the thin ones burn while the thick ones are still pale. Aim for 12 to 16 wedges of roughly the same width; more wedges than that and the petals get too thin to hold their shape.
Tip 4: Make the dipping sauce first and let it sit. The sauce actually improves after 15 to 20 minutes in the fridge, as the horseradish and cayenne mellow into the mayo base instead of sitting on top of it. Mix it while the onion soaks so the flavors have time to settle before serving.
Variations and Substitutions
Dietary Variations:
- Gluten-free: Swap the all-purpose flour for a 1:1 gluten-free blend (I’ve tested Bob’s Red Mill 1:1) and use a gluten-free hot sauce. The coating is slightly more delicate and browns a touch faster, so check it a minute earlier than the recipe states.
- Air fryer version: Spray the double-dredged onion generously with oil and air fry at 375°F for 12 to 15 minutes, flipping once at the halfway mark. You lose some of the deep-fried shatter, but the petals still crisp up and separate well.
Flavor Variations:
- Extra heat: Double the cayenne in the flour mix and add ½ teaspoon cayenne to the buttermilk soak for a coating that has real heat all the way through, not just on the surface.
Ingredient Substitutions:
- No buttermilk on hand? Whisk 2 cups whole milk with 2 tablespoons lemon juice or white vinegar and let it sit for 5 minutes — it won’t be identical, but it acidifies the milk close enough to work.
- No horseradish for the sauce? Swap in an equal amount of extra-hot prepared mustard; the sharpness is different but it still cuts through the mayo base.
If you’re building out a full Texas Roadhouse-style spread at home, this onion blossom pairs well as a starter before something with real broth depth — my Cheesecake Factory gumbo recipe is another copycat I’ve tested extensively and makes a solid follow-up course.
Troubleshooting
Why did my onion blossom fall apart in the oil?
This almost always comes back to the root cut. If you left less than ½ inch of root intact, the petals lose their anchor point and detach once they hit hot oil. Recut your next onion leaving a full ½ inch at the base — see the Controlled Test section above for exactly what that depth should look like.
Why is my coating soggy instead of crisp?
Two likely causes: the oil wasn’t hot enough (check with a thermometer — 350°F is the target, and it dips fast once you add the onion, so preheat a little higher to compensate), or the onion sat too long after frying before serving. Fried coating loses crispness within about 10 minutes as steam from the onion works its way back out into the shell — serve it as soon as it’s drained.
Why does the center still taste raw?
If the outside is deep golden but the inner petals taste sharp and undercooked, your oil was likely too hot, browning the coating before the heat had time to penetrate to the core. Drop the temperature to 325°F and fry a minute or two longer next time — low and slower gets the center cooked without torching the shell.
Storage and Make-Ahead
Counter: Not recommended — the coating turns soft within an hour at room temperature.
Refrigerator: Leftover fried onion blossom keeps for up to 2 days in an airtight container, though the coating will soften noticeably.
Freeze: You can freeze the onion at the double-dredged, unfried stage. Freeze it whole on a tray until solid, then wrap tightly in plastic and store for up to 1 month. Fry straight from frozen, adding 2 to 3 extra minutes to the fry time.
Reheating: Reheat leftover fried onion in a 375°F oven for 6 to 8 minutes, or in an air fryer at 375°F for 4 minutes, to bring some crispness back. The microwave will make the coating rubbery — avoid it.
Make-Ahead: The dipping sauce can be made up to 3 days ahead and stored covered in the fridge; the flavor actually improves after a day. The onion can be cut and stored (uncut side wrapped) in the fridge for up to 1 day before soaking.
Frequently Asked Questions
Q: What kind of onion does Texas Roadhouse use for their onion blossom? A: A large sweet onion, typically Vidalia or a similar variety. Sweet onions have looser layers than storage yellow onions, which makes it much easier to get the petals to fan open into a full bloom.
Q: Can I bake this instead of frying it? A: You can, though the texture changes. Bake the double-dredged onion at 425°F on a wire rack for 30 to 35 minutes, spraying lightly with oil halfway through. It won’t be as deeply crisp as the fried version, but the petals still separate and cook through.
Q: Why do you dip it in flour twice instead of once? A: A single dredge fries up thin and patchy, with the coating sliding off wherever the petals overlap. The second dip after a quick re-dunk in buttermilk builds enough thickness for the shell to hold together and crisp evenly — I tested both side by side and the difference is obvious in the finished bloom.
Q: What’s in the Texas Roadhouse dipping sauce? A: A mayonnaise and ketchup base with prepared horseradish for sharpness and cayenne plus paprika for heat and color. It’s not a ranch-style sauce, despite how often that gets suggested online.
Q: Can I make this ahead of time for a party? A: Fry it as close to serving as you can — the coating is at its best in the first 10 minutes out of the oil. You can prep and double-dredge the onion up to a day ahead and refrigerate it, then fry it right before guests arrive.
Q: My onion petals won’t separate even after soaking. What am I doing wrong? A: Check your root cut depth first — too much root left intact is the most common cause. Also try gently working your fingers between the petals under running water before the buttermilk soak; sometimes the layers just need a physical assist to start separating.
Q: Is this the same as a “blooming onion” from other restaurants? A: The technique is nearly identical across most steakhouse chains — the differences come down to the seasoning blend in the flour and the exact ratio in the dipping sauce, which is what this recipe is built to match for the Texas Roadhouse version specifically.
Q: Can I make a smaller version for two people? A: Yes — use a smaller sweet onion (about 3 inches wide) and reduce the fry time to 3 to 4 minutes total, watching the color closely since smaller onions cook through faster.
More Appetizer Recipes You’ll Love
- Cheesecake Factory Gumbo Recipe — a rich, tested copycat of the restaurant’s signature gumbo, perfect for pairing with a fried starter
- Cava Rice Recipe — the copycat herbed rice base from Cava, useful as a side for a full copycat restaurant spread
- Cava Sweet Potato Recipe — roasted sweet potatoes with the exact seasoning blend Cava uses
- Squash Alabama Recipe — a Southern-style squash side that rounds out a steakhouse-inspired dinner
Foolproof Texas Roadhouse Onion Blossom
Ingredients
For the Onion Blossom:
- 1 large sweet Vidalia onion (4–5 inches wide)
- 2 cup buttermilk
- 1 tablespoon hot sauce
- 2 cup all-purpose flour
- 1/2 cup cornstarch
- 1 tablespoon paprika
- 1 teaspoon cayenne pepper
- 2 teaspoon garlic powder
- 2 teaspoon onion powder
- 1 teaspoon dried oregano
- 11/2 teaspoon kosher salt
- 1/2 teaspoon black pepper
- Neutral oil (vegetable or canola), for frying
For the Dipping Sauce:
- 1/2 cup mayonnaise
- 2 tablespoon ketchup
- 1 tablespoon prepared horseradish
- 1/4 teaspoon cayenne pepper
- 1/4 teaspoon paprika
- Pinch of kosher salt
Instructions
- Slice ½ inch off the top of the onion and peel away the skin, leaving the root end intact. Set root-side down and cut 12 to 16 evenly spaced wedges from top to root, stopping ½ inch above the root on each cut.
- Whisk the buttermilk and hot sauce together in a bowl large enough to submerge the onion. Set the onion in cut-side down, then turn root-side down and gently press the petals open. Soak for at least 30 minutes.
- Whisk together the flour, cornstarch, paprika, cayenne, garlic powder, onion powder, oregano, salt, and pepper in a large bowl.
- Lift the onion from the buttermilk and dredge in the flour mixture, working the flour between every petal. Dip back into the buttermilk for 10 seconds, then dredge in the flour a second time.
- Place the dredged onion on a wire rack and refrigerate, uncovered, for 20 minutes.
- While the onion chills, whisk together the mayonnaise, ketchup, horseradish, cayenne, paprika, and salt for the dipping sauce. Refrigerate until serving.
- Heat at least 3 inches of oil to 350°F in a large pot. Lower the onion in petal-side down, then flip root-side down after 1 minute. Fry for 4 to 6 minutes, until deep golden brown all over.
- Lift the onion out and drain root-side down on a wire rack for 2 minutes. Gently pull the outer petals open wider by hand, then serve immediately with the dipping sauce spooned into the center.
Notes
- Leave exactly ½ inch of root intact when cutting — more and the petals won’t separate, less and they’ll detach in the oil.
- The dipping sauce improves after 15–20 minutes in the fridge as the flavors settle; make it while the onion soaks.
- For gluten-free, use a 1:1 GF flour blend and a gluten-free hot sauce; check for doneness a minute earlier since the coating browns faster.
- To freeze, double-dredge the onion, freeze whole on a tray until solid, then wrap tightly for up to 1 month. Fry from frozen, adding 2–3 extra minutes.
- Reheat leftovers in a 375°F oven or air fryer for 4–8 minutes to restore crispness; avoid the microwave, which turns the coating rubbery.