Foolproof Peppermint Brownie Bread

If you’ve ever made peppermint brownie bread and had them turn out either dry and cakey or so minty they tasted like toothpaste, you know the two ways this can go wrong. I’ve made both mistakes. The first time I tried turning a brownie into a loaf, I baked it like banana bread — low and slow — and pulled out something that sliced clean but tasted like sweetened cardboard. No fudge. No crackly top. Just a brownie-shaped disappointment.
I tested this recipe four times before I landed on the version below. The fix ended up being smaller than I expected: it wasn’t the flour or the sugar, it was the bake time and the amount of peppermint extract. Too long in the oven and you lose the fudgy center that makes brownie bread worth making in the first place. Too much peppermint extract and every bite tastes like mouthwash — even a quarter teaspoon over what’s called for pushes it into soapy territory.
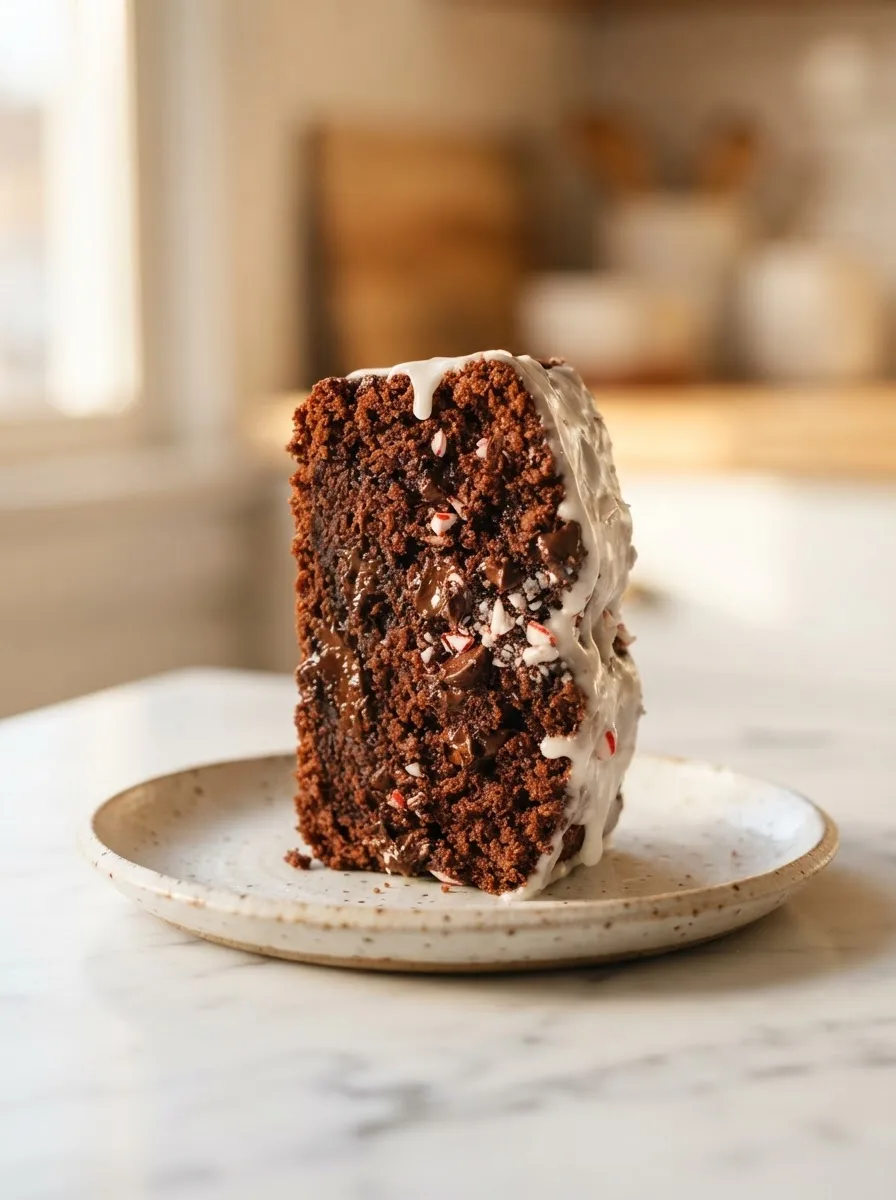
The result is a loaf that slices like bread but eats like a brownie — dense, fudgy in the center, with a crackly cocoa crust on top and just enough peppermint to taste like the holidays without tasting like Listerine.
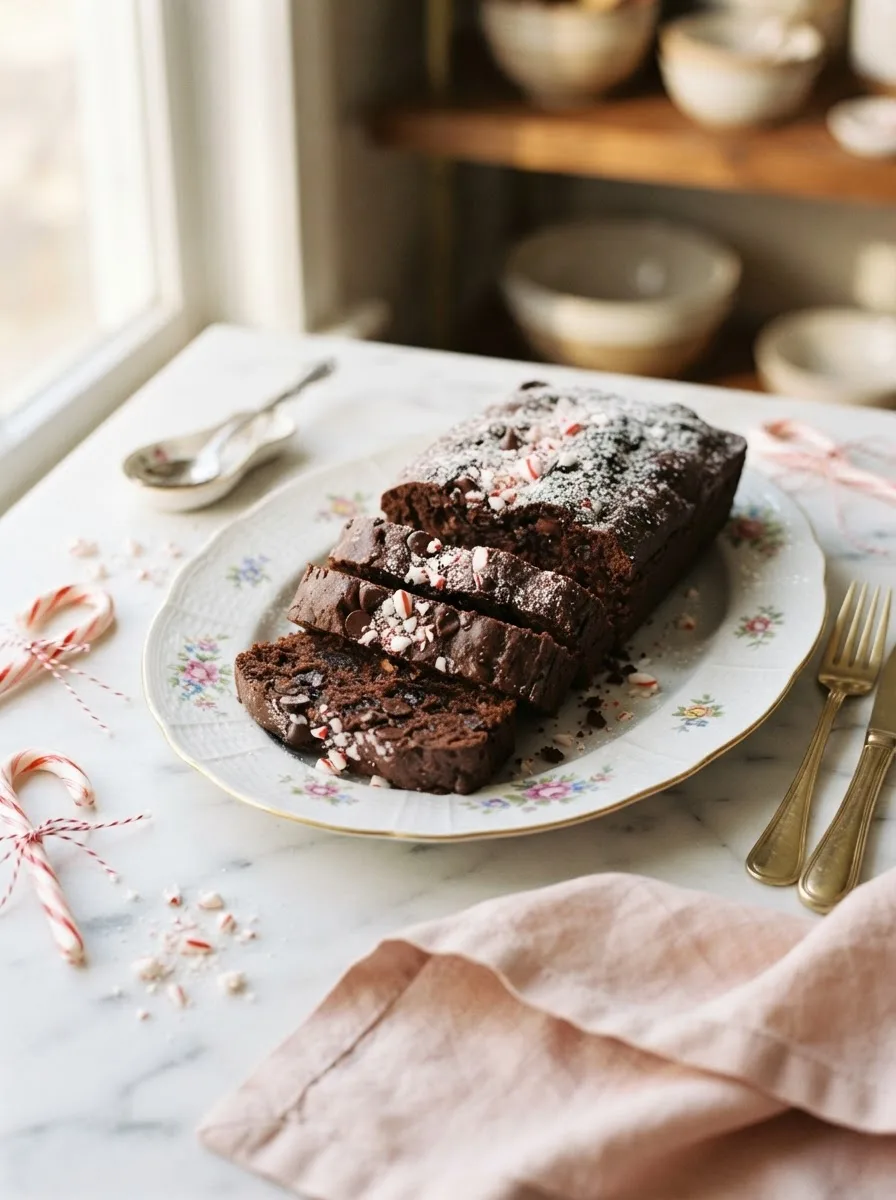
What makes this version different from a regular brownie recipe baked in a loaf pan is the ratio. Most people just pour brownie batter into a bread pan and call it a day — but a standard brownie batter is too wet to hold its shape as a tall loaf. This recipe adds a touch more flour and an extra egg to give the batter enough structure to rise like bread while staying fudgy in the middle, the same way a good pound cake holds its shape without turning dry.
The peppermint glaze on top isn’t just decorative. It seeps slightly into the crackly top as it sets, so the first inch of each slice gets a little extra sweetness and mint before you hit the dense, fudgy center.
★★★★★ “I made this for a cookie exchange and it disappeared before the actual cookies did. Nobody believed it was a ‘bread.’ It’s a brownie in bread’s clothing.” — Marissa T., recipe tester (pre-launch)
Why You’ll Love This Peppermint Brownie Bread
- Fudgy, not cakey: The extra egg and reduced bake time keep the center dense and brownie-like instead of dry and crumbly like a typical quick bread.
- One bowl, no mixer: Everything comes together with a whisk and a spatula. No stand mixer, no separate creaming step.
- Real peppermint flavor, not soapy: I tested the extract amount specifically to avoid the medicinal taste that ruins a lot of peppermint desserts.
- Slices clean: Unlike a fudgy brownie square that falls apart on the fork, this loaf firms up enough to slice into neat pieces — good for a dessert table or a gift.
Key Ingredients
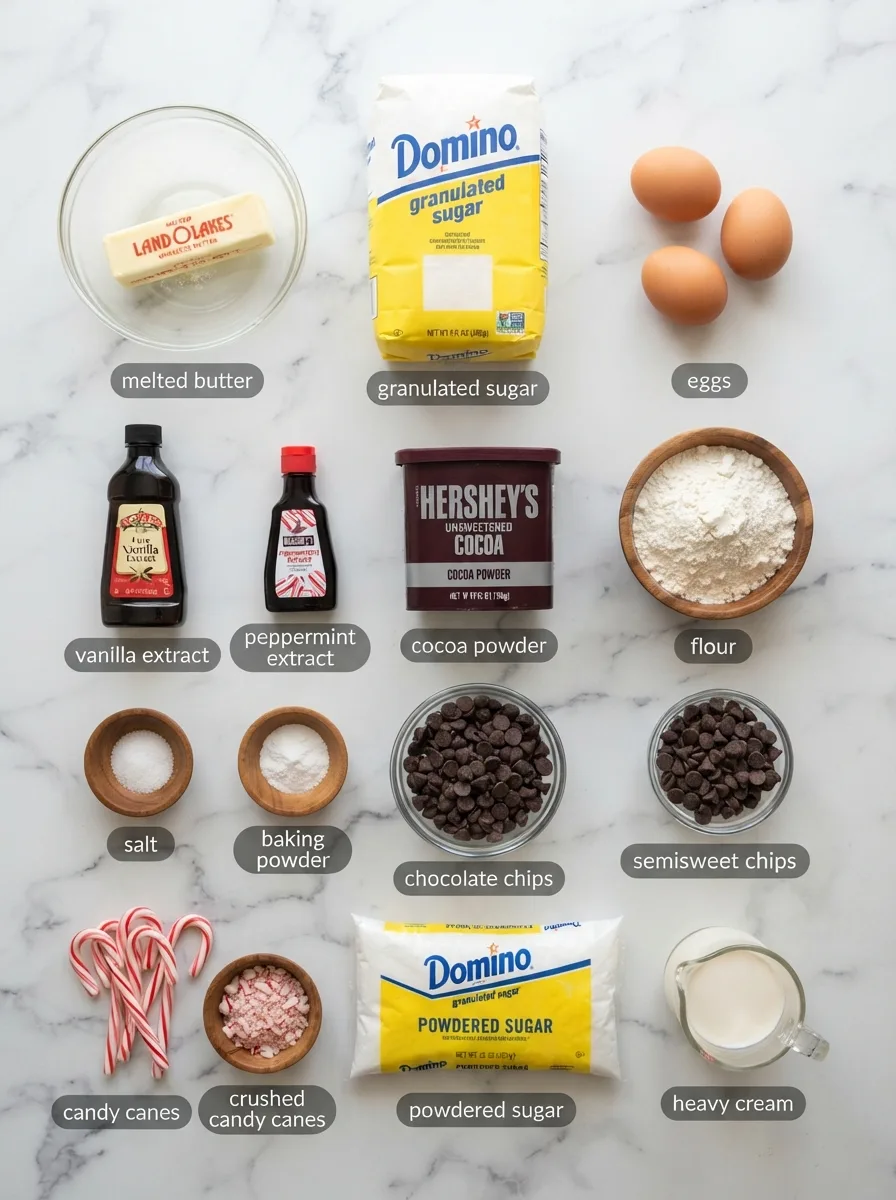
Unsalted butter, melted (1 cup). Melted butter — not softened, not creamed — is what gives this bread its fudgy texture instead of a fluffy cake crumb. Creaming butter and sugar whips air into the batter; melting it doesn’t. Less air means a denser, more brownie-like result.
Unsweetened cocoa powder (¾ cup). Regular natural cocoa powder works fine here, but Dutch-process cocoa gives a slightly darker, more chocolate-forward flavor if you have it on hand. Don’t substitute cocoa mix — it has added sugar and won’t give you the same deep chocolate base.
Peppermint extract (½ teaspoon in the batter, ¼ teaspoon in the glaze). This is the ingredient that made or broke every one of my four tests. Peppermint extract is significantly more concentrated than peppermint oil or mint flavoring, and it’s easy to overpour. A half teaspoon in a full loaf of batter is enough — go beyond ¾ teaspoon total and the loaf tastes like a candy cane dissolved in mouthwash instead of a subtle mint-chocolate bread.
Eggs (3 large, room temperature). One more egg than a typical brownie recipe. The extra egg adds structure so the batter holds up as a tall loaf instead of collapsing in the center the way a thinner brownie batter would in a bread pan.
Semisweet chocolate chips (1 cup, divided). Half go into the batter, half get pressed into the top before baking so they melt into visible pools once the loaf is done. Milk chocolate chips work too, but they make the finished loaf noticeably sweeter — I’d only recommend them if you’re already scaling back the peppermint.
Crushed candy canes (½ cup, divided). Crush these yourself in a zip-top bag with a rolling pin rather than buying pre-crushed peppermint bits — the pieces are usually more uniform and less powdery, which matters for how they look pressed into the batter.
Ingredient Note: Measure your peppermint extract with an actual measuring spoon, not a “glug” from the bottle. A half teaspoon looks like almost nothing, and that’s correct. This is the single most common way this recipe goes wrong.
Equipment You’ll Need
- 9×5-inch loaf pan — Standard metal loaf pan works best for even baking. A glass pan will work, but reduce the oven temperature by 25°F since glass holds heat longer and can overbake the edges.
- Large mixing bowl — This is a one-bowl recipe, so use something roomy enough to whisk in without splashing.
- Whisk and rubber spatula — No mixer required. A whisk handles the wet ingredients; a spatula folds in the dry ingredients and mix-ins.
- Kitchen scale (optional but recommended) — Weighing the flour and cocoa powder in grams avoids the packed-cup problem that leads to dry, dense bread.
- Wire cooling rack — Letting the loaf cool on a rack (not in the pan) keeps the bottom from turning gummy from trapped steam.
Controlling Fudginess (A Controlled Test)
The single biggest variable in this recipe isn’t an ingredient — it’s bake time. I tested this loaf at three different bake times, changing nothing else, to see exactly where the line is between an underbaked mess, a proper fudgy loaf, and an overbaked, dry brick.
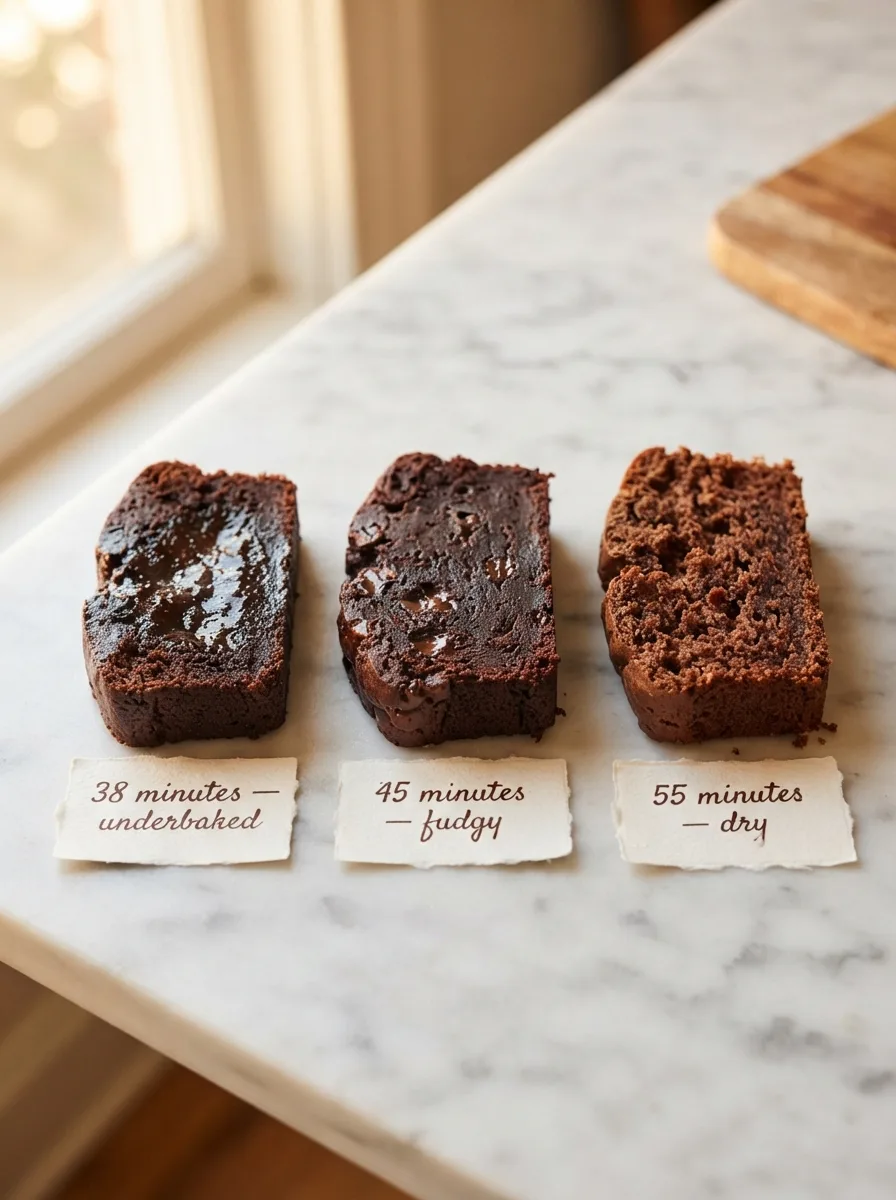
38 minutes: The center was still glossy and wet when sliced — batter, not bread. It looked underbaked because it was. A toothpick came out coated, not just with a few crumbs.
45 minutes: This is the version in the recipe card. The top had a crackly, matte crust, the toothpick came out with a few moist crumbs (not wet batter), and the center held together when sliced without being dry.
55 minutes: By this point the crumb had gone visibly pale and crumbly at the edges, and the fudgy quality was gone entirely — it ate more like a dense chocolate quick bread than a brownie.
The takeaway: 45 minutes at 350°F is the sweet spot for a standard 9×5 metal pan. If you want it slightly fudgier, pull it at 42 minutes and check for a few moist (not wet) crumbs on the toothpick. Every oven runs a little differently, so start checking at the 40-minute mark rather than trusting the timer alone.
How to Make Peppermint Brownie Bread
Before you start: Preheat your oven to 350°F and grease a 9×5-inch loaf pan, or line it with parchment paper for easy removal. Make sure your eggs are at room temperature — cold eggs can cause the melted butter to seize into small clumps instead of blending smoothly.
Step 1 — Whisk the butter and sugar
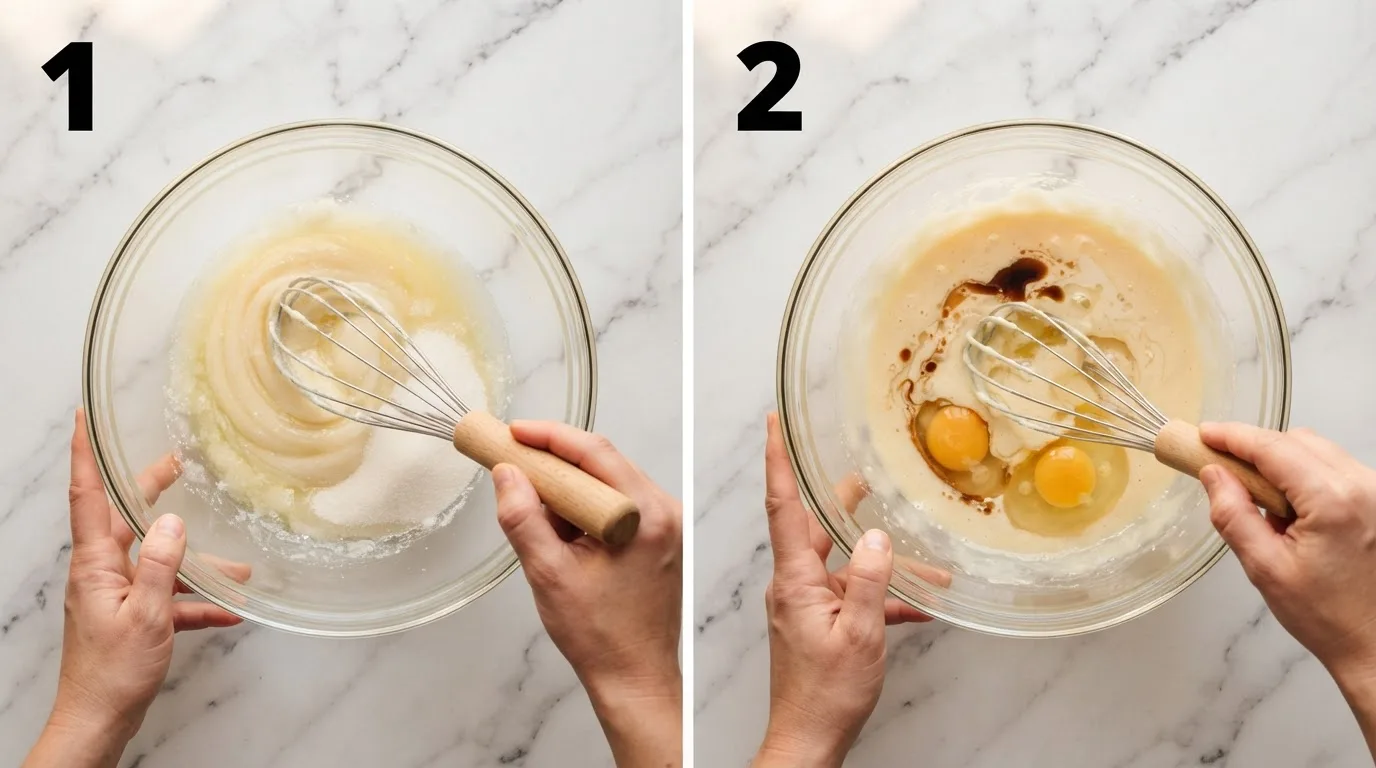
In a large bowl, whisk the melted butter and granulated sugar together vigorously for about 30 seconds. You’re not creaming here — you’re dissolving. The sugar should look slightly less grainy and the mixture should turn a pale, glossy tan. This short vigorous whisk is part of what gives the top of the loaf its crackly finish once baked.
Step 2 — Add the eggs and extracts
Whisk in the eggs one at a time, followed by the vanilla extract and peppermint extract. The mixture will look glossy and slightly thickened. Take the peppermint extract seriously here — measure it, don’t eyeball it. Too much at this stage cannot be corrected later.
Step 3 — Fold in the dry ingredients
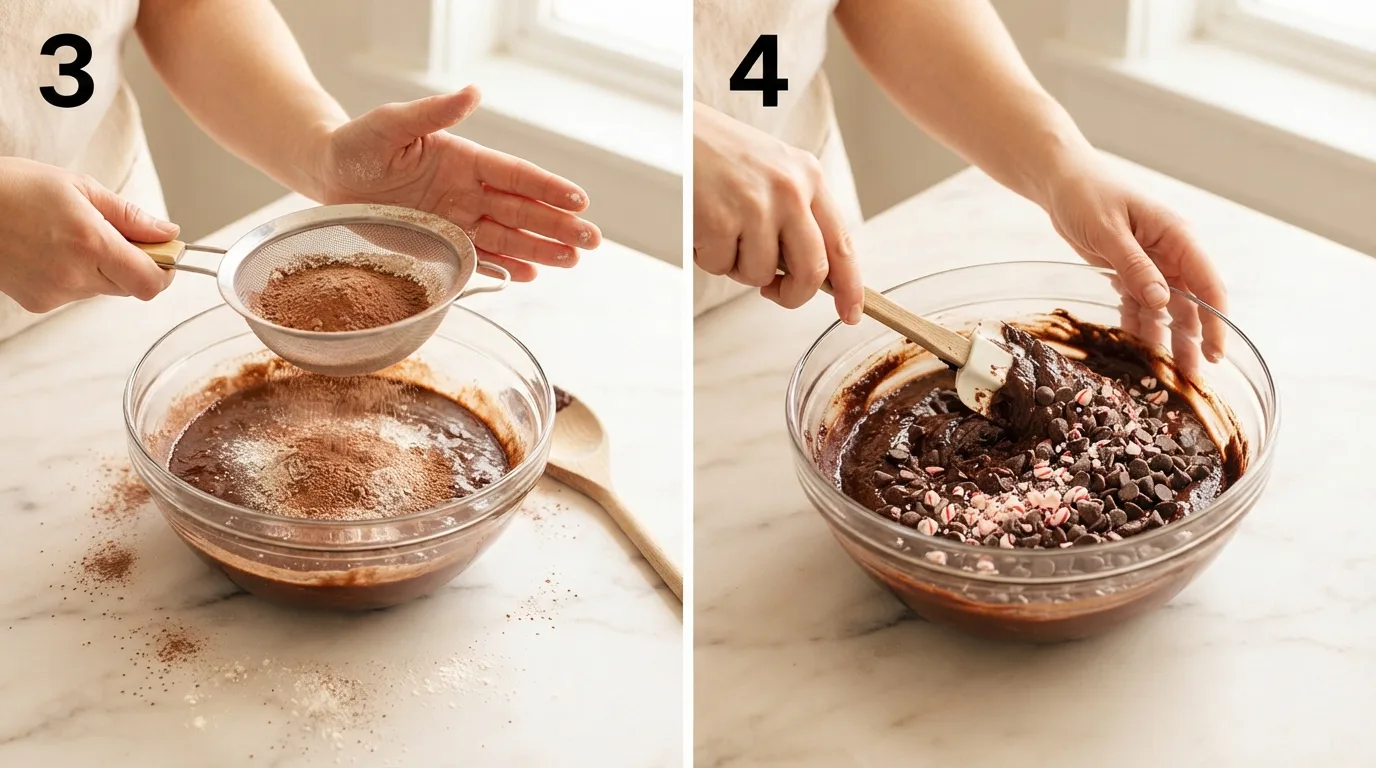
Sift the cocoa powder, flour, salt, and baking powder over the wet mixture (sifting the cocoa specifically prevents lumps). Fold gently with a spatula just until no dry streaks remain. The batter will be thick and glossy, closer to brownie batter than cake batter — that’s correct. Overmixing at this stage develops gluten and makes the loaf tougher, so stop as soon as the flour disappears.
Step 4 — Fold in the chocolate chips and candy cane
Fold in half of the chocolate chips and half of the crushed candy cane pieces, reserving the rest for topping. Save the remainder — pressing extra chips and candy cane pieces into the top of the batter right before baking gives you those visible melted pools on the crust.
Step 5 — Pour, top, and bake
Pour the batter into the prepared loaf pan and smooth the top with your spatula. Sprinkle the reserved chocolate chips and candy cane pieces evenly over the surface, pressing them in very lightly so they don’t roll off. Bake at 350°F for 42–45 minutes, checking at the 40-minute mark. The loaf is done when the top looks matte and crackly rather than shiny, and a toothpick inserted in the center comes out with a few moist crumbs — not wet batter, not completely clean.
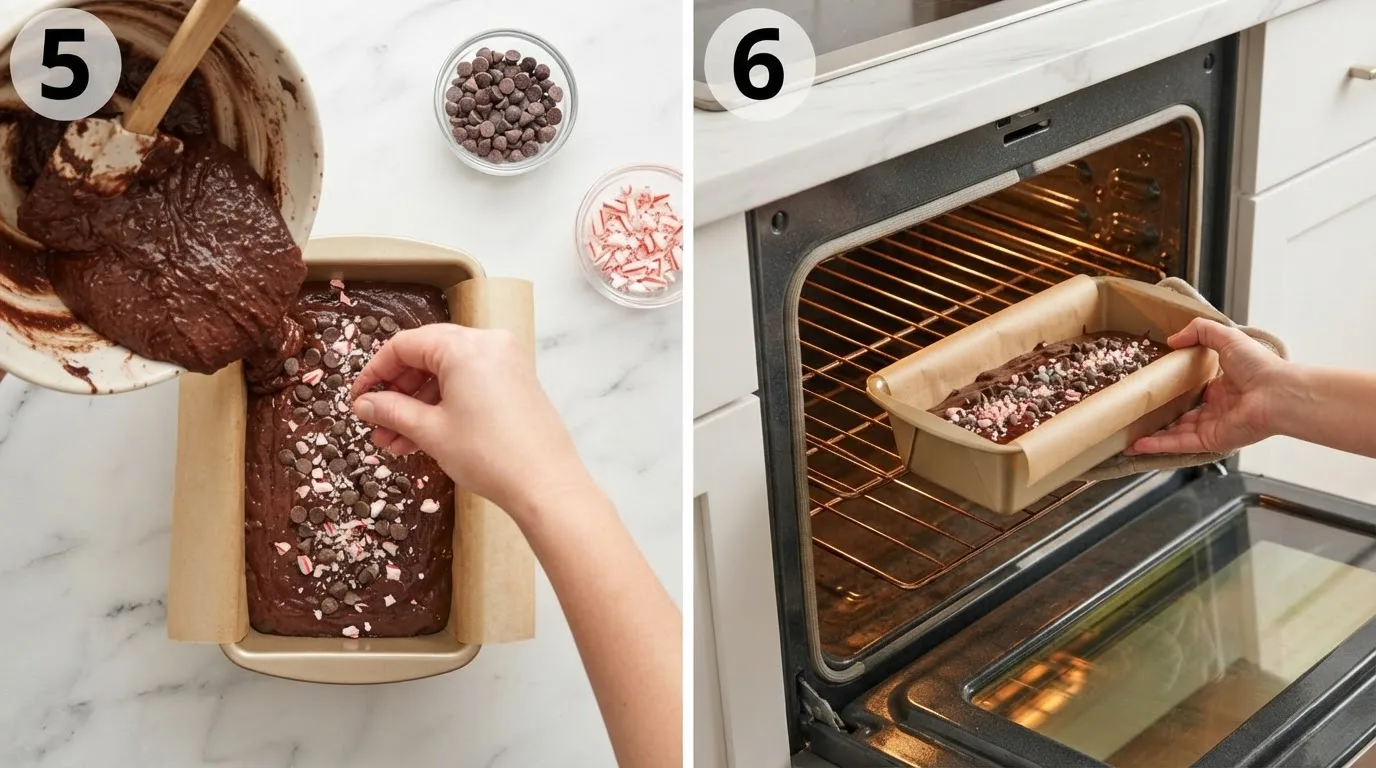
Step 6 — Cool completely, then glaze
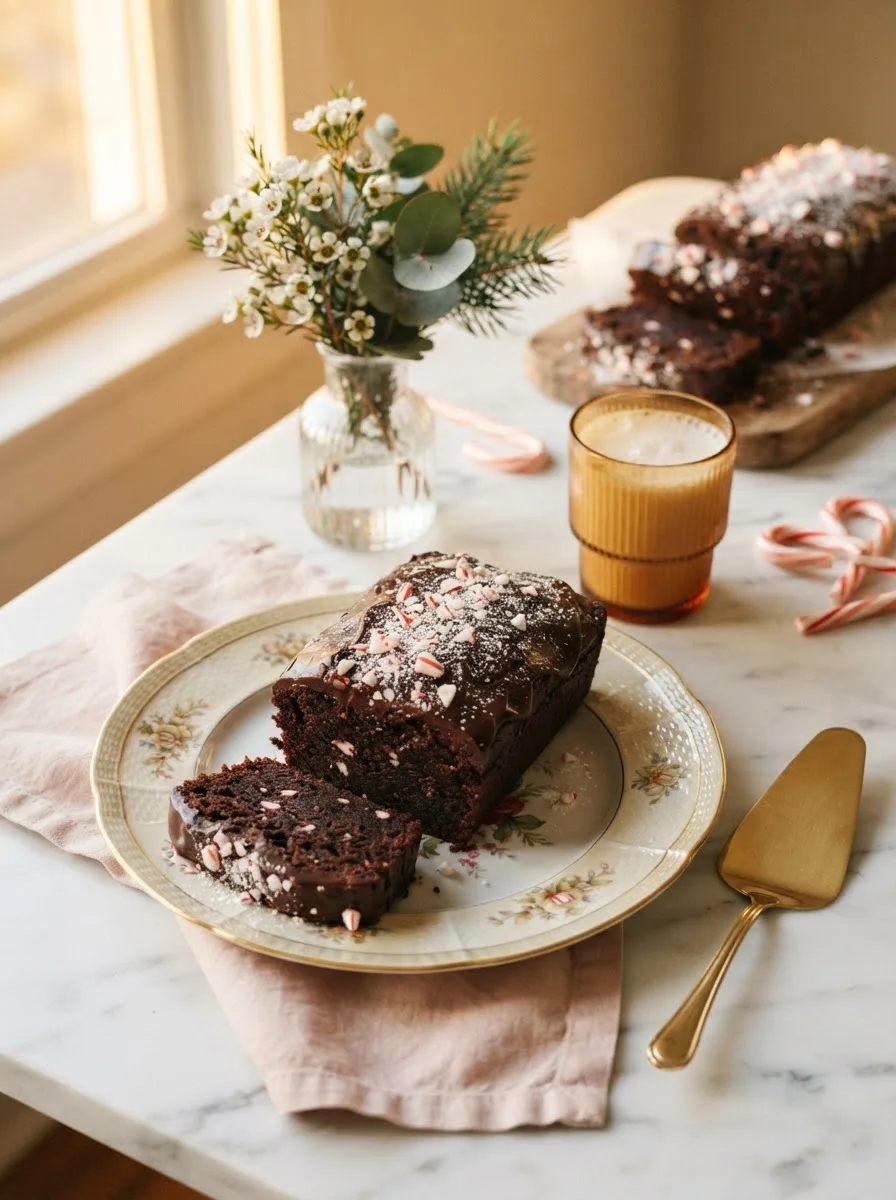
Let the loaf cool in the pan for 10 minutes, then transfer it to a wire rack to cool completely — at least an hour. This part is hard to be patient about, but glazing a warm loaf makes the glaze melt and slide right off instead of setting into a clean layer. Once cool, whisk together the powdered sugar, heavy cream, and peppermint extract for the glaze until smooth and drizzle over the top. Finish with the remaining crushed candy cane while the glaze is still wet so the pieces stick.
Pro Tips for Perfect Peppermint Brownie Bread
Tip 1: Weigh your flour and cocoa powder. Scooping directly from the bag packs extra flour into the cup, which is one of the most common reasons quick breads turn out dense and dry. If you don’t have a scale, spoon the flour into the measuring cup and level it off with a knife instead of scooping.
Tip 2: Don’t skip the parchment sling. Line the pan with a strip of parchment paper long enough to hang over both long sides. Once cooled, you can lift the loaf straight out instead of fighting to invert it, which matters a lot with a fudgy loaf that can tear.
Tip 3: Taste your peppermint extract brand before committing to the full amount. Extract potency varies noticeably between brands. If you’re using a new brand for the first time, start with a scant ⅜ teaspoon in the batter and taste the raw batter — yes, it’s safe with pasteurized eggs from a carton — before deciding to add the rest.
Tip 4: Crush your own candy canes. Pre-crushed peppermint bits from the baking aisle are often powdery and dissolve into the batter rather than staying visible. Crushing whole candy canes yourself in a zip-top bag gives you larger, more textured pieces that hold their shape and crunch on top.
Variations and Substitutions
Dietary Variations:
- Gluten-free: Swap the all-purpose flour for a 1:1 gluten-free baking blend that includes xanthan gum. The texture stays close to the original, though the crumb is slightly more delicate — handle sliced pieces gently.
- Dairy-free: Use a plant-based butter and swap the heavy cream in the glaze for full-fat coconut cream. The loaf itself stays fudgy; the glaze will have a very faint coconut note.
Flavor Variations:
- White chocolate peppermint: Swap half the semisweet chips for white chocolate chips for a sweeter, more candy-cane-forward loaf.
- Dark chocolate peppermint: Use 60% cacao chips instead of semisweet for a more bittersweet contrast against the sugary glaze.
Ingredient Substitutions:
- No candy canes on hand? Crushed peppermint starlight mints work identically — just crush a bit finer since they’re denser.
- Out of heavy cream for the glaze? Whole milk works, though the glaze will be slightly thinner and set less firmly.
If you like the idea of a dessert baked in loaf form, this cheesecake bread is another one worth trying — same slice-and-serve format, completely different flavor direction.
Troubleshooting
Why did my brownie bread sink in the middle?
This usually means it came out of the oven before it finished baking. If the center sinks after cooling, the structure hadn’t fully set. Next time, bake a few minutes longer and check with a toothpick at the 42-minute mark instead of pulling it right at 38.
Why does my loaf taste like mouthwash instead of chocolate mint?
This is almost always too much peppermint extract. Extract is far more concentrated than you’d expect from the small bottle — stick to the ½ teaspoon in the batter and resist the urge to add “just a little more” for extra flavor. If your batch tastes soapy, there’s no fix for that loaf, but it’s an easy one to correct next time by measuring exactly.
My glaze slid off instead of setting — what happened?
The loaf was still warm when glazed. Even a loaf that feels cool to the touch on the outside can still be warm in the center. Let it cool for a full hour on a wire rack before glazing, and if you’re in a hurry, you can speed this up by transferring cooled slices to the fridge for 15 minutes first.
Storage and Make-Ahead
Counter: Store the glazed loaf in an airtight container at room temperature for up to 3 days. The fudgy texture holds up well; the top may soften slightly as the glaze settles further into the crust.
Refrigerator: Up to 1 week in an airtight container. The cold actually firms up the fudgy texture nicely — bring slices to room temperature or warm briefly before serving for the best texture.
Freeze unbaked batter: Not recommended — the leavening loses effectiveness and the texture suffers. Bake the full loaf, then freeze slices instead.
Freeze baked bread: Wrap unglazed, cooled slices individually in plastic wrap, then place in a freezer bag for up to 3 months. Glaze after thawing, not before, since the glaze doesn’t freeze well.
Reheating: Thaw frozen slices overnight in the refrigerator, then microwave for 10–15 seconds to bring back that just-baked fudgy warmth.
Make-Ahead: The loaf can be baked a day in advance, cooled completely, and stored unglazed at room temperature wrapped tightly. Glaze the morning you plan to serve it for the freshest-looking topping.
Frequently Asked Questions
Q: Can I use peppermint oil instead of peppermint extract? A: Yes, but use far less — peppermint oil is significantly more concentrated than extract. Start with just ¼ of the amount called for (about ⅛ teaspoon) and taste the batter before adding more.
Q: Does this taste like a candy cane or like chocolate mint? A: At the ½ teaspoon amount in the recipe card, it reads as chocolate mint — noticeable but balanced. If you want a stronger candy cane punch, the crushed candy cane pieces on top do more of that work than adding extra extract.
Q: Can I make this in a Bundt pan instead of a loaf pan? A: Yes, though you’ll need to roughly double the batter to fill a standard Bundt pan properly, and the bake time will drop to around 35–38 minutes since the batter is spread thinner around the ring.
Q: My loaf pan is glass — do I need to change anything? A: Reduce the oven temperature to 325°F and start checking for doneness a few minutes early. Glass holds and transfers heat differently than metal, and can overbake the edges at 350°F.
Q: Can I skip the glaze? A: Yes — the loaf is plenty sweet and flavorful on its own with just the pressed-in chocolate chips and candy cane on top. The glaze mainly adds shine and an extra hit of peppermint.
Q: Why is my batter so thick? Did I do something wrong? A: No — this batter is meant to be thick, closer to brownie batter than a pourable cake batter. If it’s genuinely stiff enough that you can’t fold in the mix-ins at all, double check your flour measurement; it may have been packed too tightly into the cup.
Q: Can I make this ahead for a holiday party? A: Yes. Bake and cool the loaf up to a day ahead, store it unglazed at room temperature, and add the glaze and candy cane topping the morning of the party for the freshest presentation.
More Recipes You’ll Love
- Cheesecake Bread — another loaf-format dessert with a rich, tangy filling baked right into the batter.
- Dolly’s Chicken and Stuffing Casserole — a comforting holiday-season main dish to pair with a sweet loaf like this one.
- Cheesy Ranch Potatoes and Sausage — an easy weeknight dinner that also works well for a holiday brunch spread.
- Banana Tempura — another dessert with a fun textural contrast, if you’re in the mood for something crispy instead of fudgy.
Foolproof Peppermint Brownie Bread
Ingredients
For the brownie bread:
- 1 cup unsalted butter, melted
- 13/4 cup granulated sugar
- 3 large eggs, room temperature
- 1 teaspoon pure vanilla extract
- 1/2 teaspoon peppermint extract
- 3/4 cup unsweetened cocoa powder
- 1 cup all-purpose flour, spooned and leveled
- 1/2 teaspoon salt
- 1/4 teaspoon baking powder
- 1 cup semisweet chocolate chips, divided
- 1/2 cup crushed candy canes, divided
For the peppermint glaze:
- 1 cup powdered sugar
- 2 –3 tablespoons heavy cream
- 1/4 teaspoon peppermint extract
- Extra crushed candy canes for topping
Instructions
- Preheat the oven to 350°F (175°C). Grease a 9×5-inch loaf pan and line it with parchment paper, leaving an overhang on both long sides.
- In a large bowl, whisk the melted butter and sugar together vigorously for about 30 seconds, until pale and glossy.
- Whisk in the eggs one at a time, then the vanilla extract and peppermint extract.
- Sift the cocoa powder, flour, salt, and baking powder over the wet mixture. Fold gently with a spatula just until no dry streaks remain. The batter will be thick.
- Fold in half the chocolate chips and half the crushed candy cane pieces.
- Pour the batter into the prepared pan and smooth the top. Sprinkle the reserved chocolate chips and candy cane over the surface, pressing lightly.
- Bake for 42–45 minutes, checking at the 40-minute mark. The loaf is done when the top is matte and crackly and a toothpick comes out with a few moist crumbs, not wet batter.
- Let the loaf cool in the pan for 10 minutes, then transfer to a wire rack to cool completely, about 1 hour.
- Whisk together the powdered sugar, heavy cream, and peppermint extract until smooth. Drizzle over the cooled loaf and top with the remaining crushed candy cane while the glaze is still wet.
- Slice with a sharp knife once the glaze has set, about 15 minutes.
Notes
- Measure the peppermint extract precisely — a half teaspoon is correct for the batter. Doubling it results in a soapy, medicinal flavor rather than a stronger mint taste.
- Store glazed loaf at room temperature in an airtight container for up to 3 days, or refrigerate for up to 1 week.
- To freeze, wrap unglazed, cooled slices individually and freeze up to 3 months; add the glaze after thawing.
- Weigh the flour and cocoa if possible — packed cups are the most common cause of a dry, dense loaf.
- If using a glass loaf pan, reduce the oven temperature to 325°F and check for doneness a few minutes early.